Blog

  • 4-Step Irresistible Fudgy Chewy Browkies

    4-Step Irresistible Fudgy Chewy Browkies

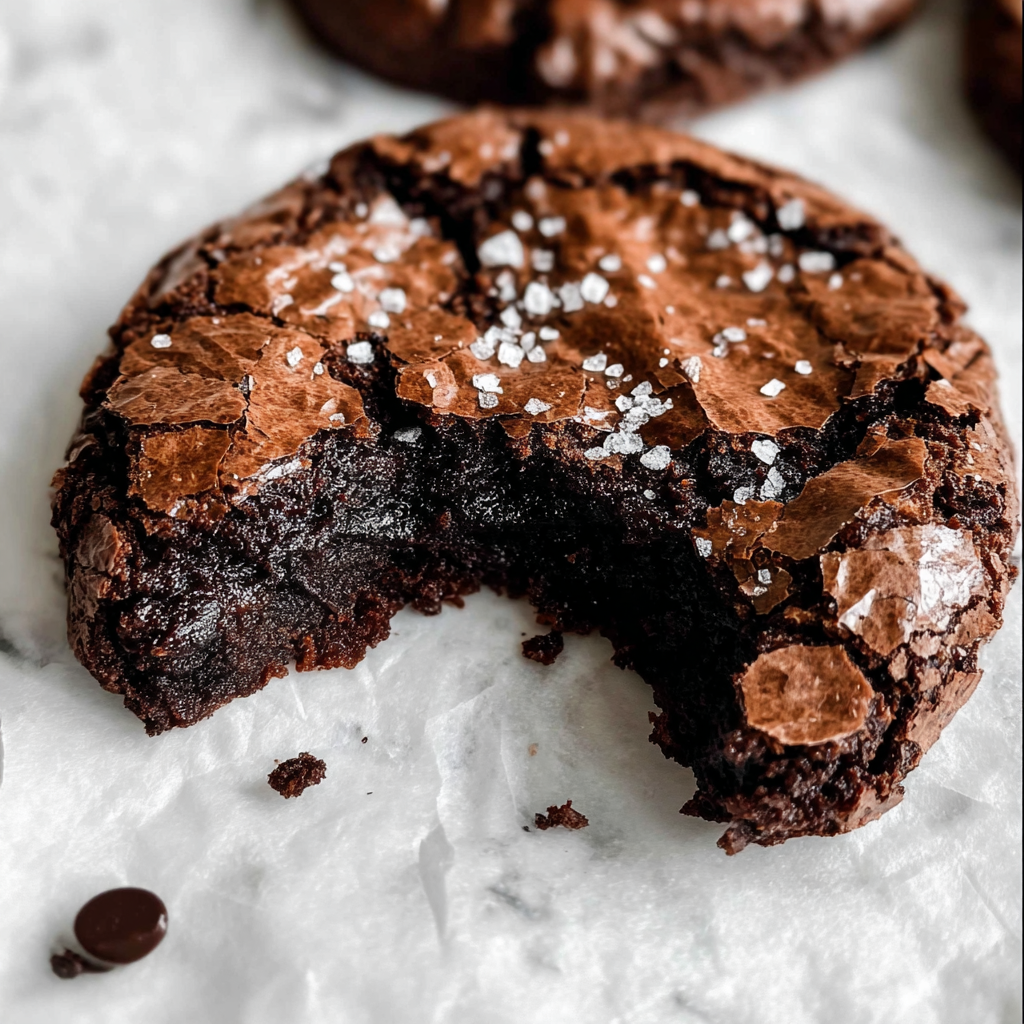
    I forgot the timer. Ben had asked a very long question about volcanoes, and I completely lost track. When I finally pulled the pan out, I was convinced I had ruined everything. But they had set into crinkle-topped, fudgy-centered, chewy-edged cookies that Mia ate in approximately four seconds. That happy accident is exactly how these fudgy chewy browkies became a permanent fixture in our house.

    Why This Recipe Is Special

    The whole point of a brookie is that you cannot decide if you want a brownie or a cookie, so you simply refuse to choose. These have the shiny, crackled top of a brownie, the fudgy dark center that pulls apart in the most satisfying way, and just enough chew around the edges to remind you that yes, this is technically a cookie. They come together in one bowl with no mixer required, which means both kids can be involved from the very start. Mia thinks that makes them her invention. I have stopped correcting her.

    How To Make Fudgy Chewy Browkies

    The batch that actually worked was a Sunday afternoon situation where I had leftover chocolate from a baking project and two kids who were bored enough to be genuinely helpful. Mia was in charge of measuring the sugar, which she took so seriously she leveled it three times. Ben stirred the melted chocolate with the focused expression of someone doing surgery. When I folded the flour in and the batter went thick and glossy and deeply dark, he leaned over the bowl and said, very quietly, “That smells like the inside of a bakery.” He was not wrong.

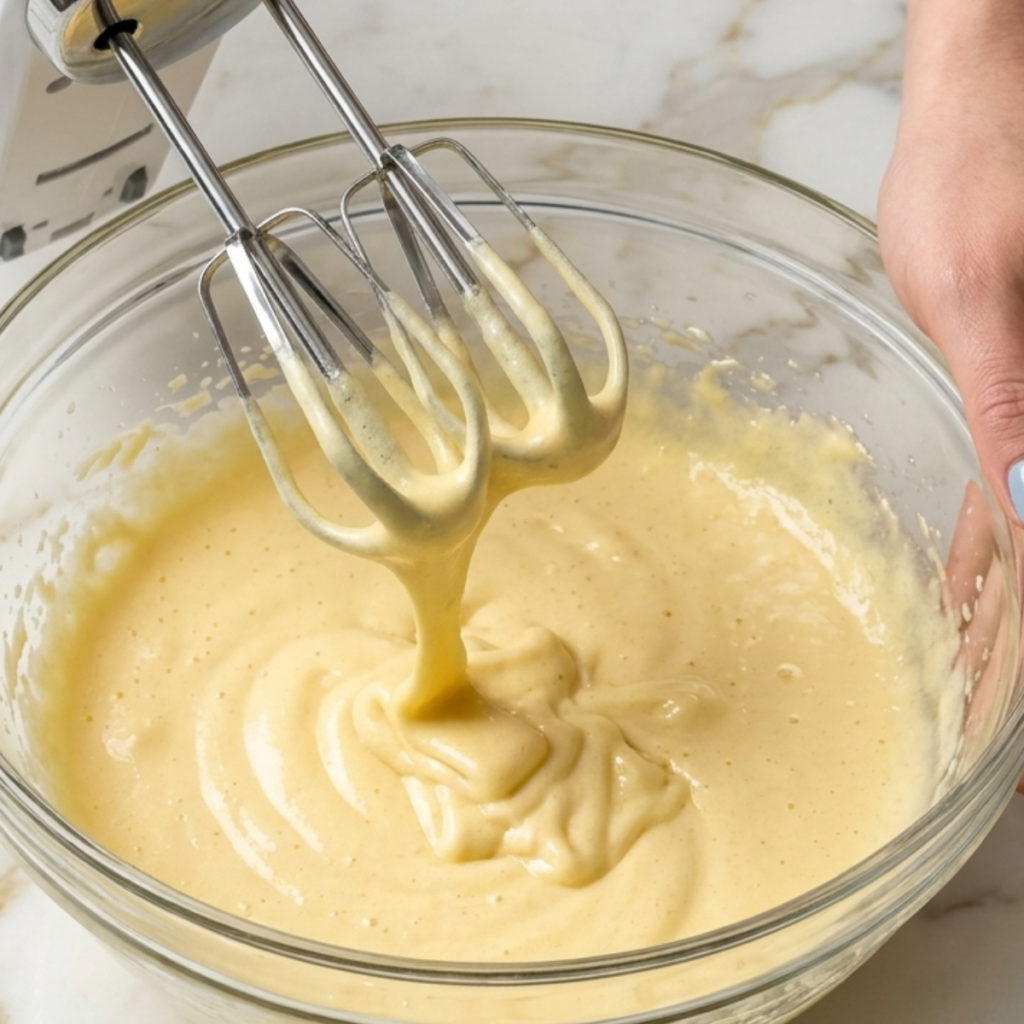
    The thing that makes these browkies work every single time is whipping the eggs and sugar together properly before anything else goes in. That step creates the signature shiny crackled top that makes everyone at the table reach for the pan before it has properly cooled. It takes about three to four minutes with a hand mixer, and it is the single most important thing you can do for this recipe. Ben now considers himself the official egg whipper, which means he stands at the bowl with tremendous authority and announces when it looks “fluffy enough.”
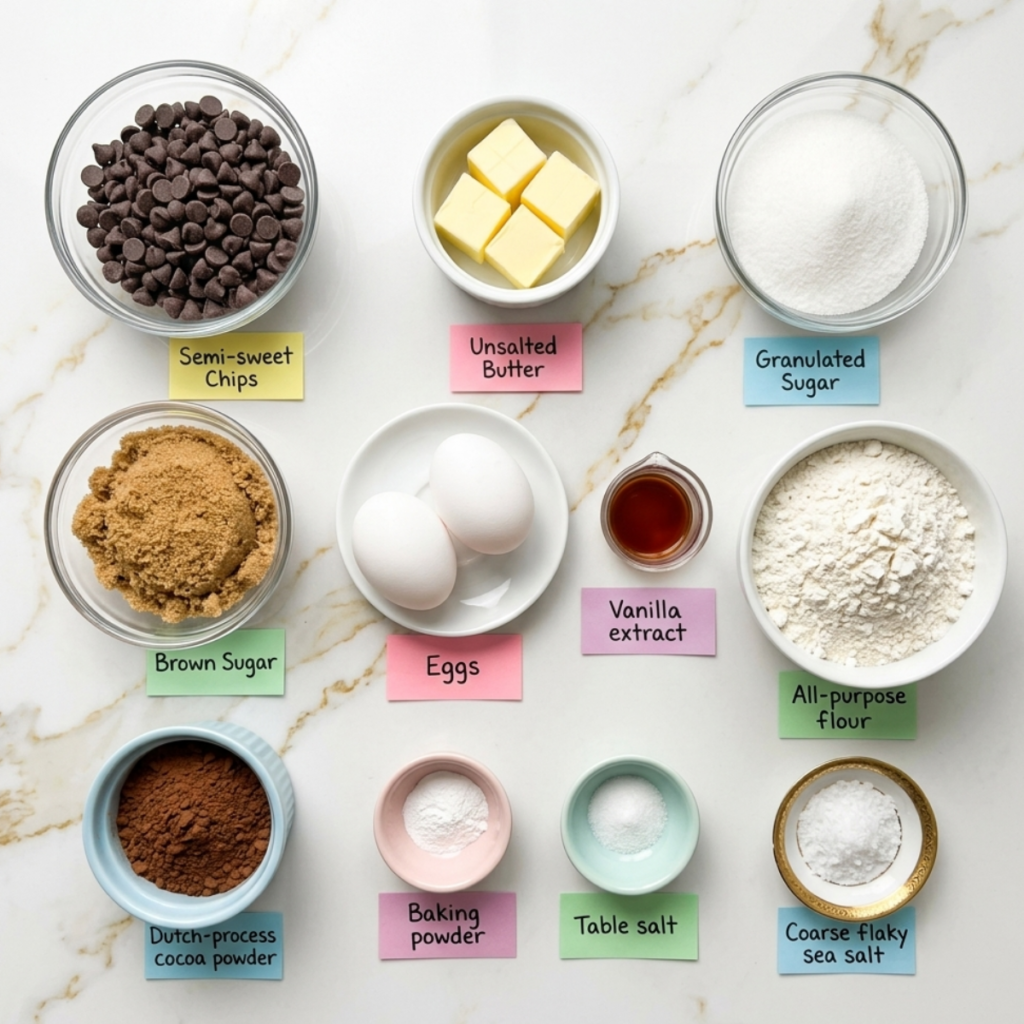
    Main Ingredients

    • 1 cup semi-sweet chocolate chips or chopped dark chocolate – Use good quality chocolate here; it is the entire flavor foundation of the browkie
    • 1/2 cup unsalted butter, cut into pieces – Melted together with the chocolate for that rich, fudgy base
    • 3/4 cup granulated sugar – Gives sweetness and helps create the shiny crackled top
    • 1/4 cup brown sugar, packed – Adds moisture and that deep caramel chew around the edges
    • 2 large eggs, room temperature – Both eggs go in together and get whipped until pale and thick
    • 1 teaspoon vanilla extract – Rounds out the chocolate flavor beautifully
    • 1/2 cup all-purpose flour – Just enough to hold the cookies together without making them cakey
    • 1/4 cup Dutch-process cocoa powder – Deepens the chocolate flavor and gives that dark, almost black brownie color
    • 1/2 teaspoon baking powder – A small lift so the cookies spread just right without puffing up
    • 1/4 teaspoon salt – Enhances all the chocolate; do not leave it out
    • 1/2 cup chocolate chips, for folding in – Extra melty pockets of chocolate in every single bite
    • Flaky sea salt, for topping – Optional but genuinely transformative; the contrast against the sweet chocolate is everything

    Step-by-Step Instructions

    Step 1: Melt the Chocolate and Butter

    • Combine the chocolate chips and butter in a heatproof bowl set over a saucepan of barely simmering water, making sure the bottom of the bowl does not touch the water
    • Stir gently and constantly until both are fully melted and the mixture is smooth, glossy, and completely combined
    • Remove from the heat and let the chocolate mixture cool for 8 to 10 minutes until it is warm but no longer hot to the touch
    • Alternatively, melt in the microwave in 30-second intervals, stirring between each, until just smooth; do not overheat or the chocolate will seize

    Step 2: Whip the Eggs and Sugar

    • Add both sugars to a large mixing bowl, then crack in the eggs and add the vanilla extract
    • Beat with a hand mixer on medium-high speed for 3 to 4 minutes until the mixture is pale, thick, and has roughly doubled in volume
    • This step is not optional; the whipped eggs create the signature shiny crackled top that makes browkies look like browkies
    • Pour the cooled chocolate mixture into the egg mixture and fold gently with a spatula until just combined and no streaks remain

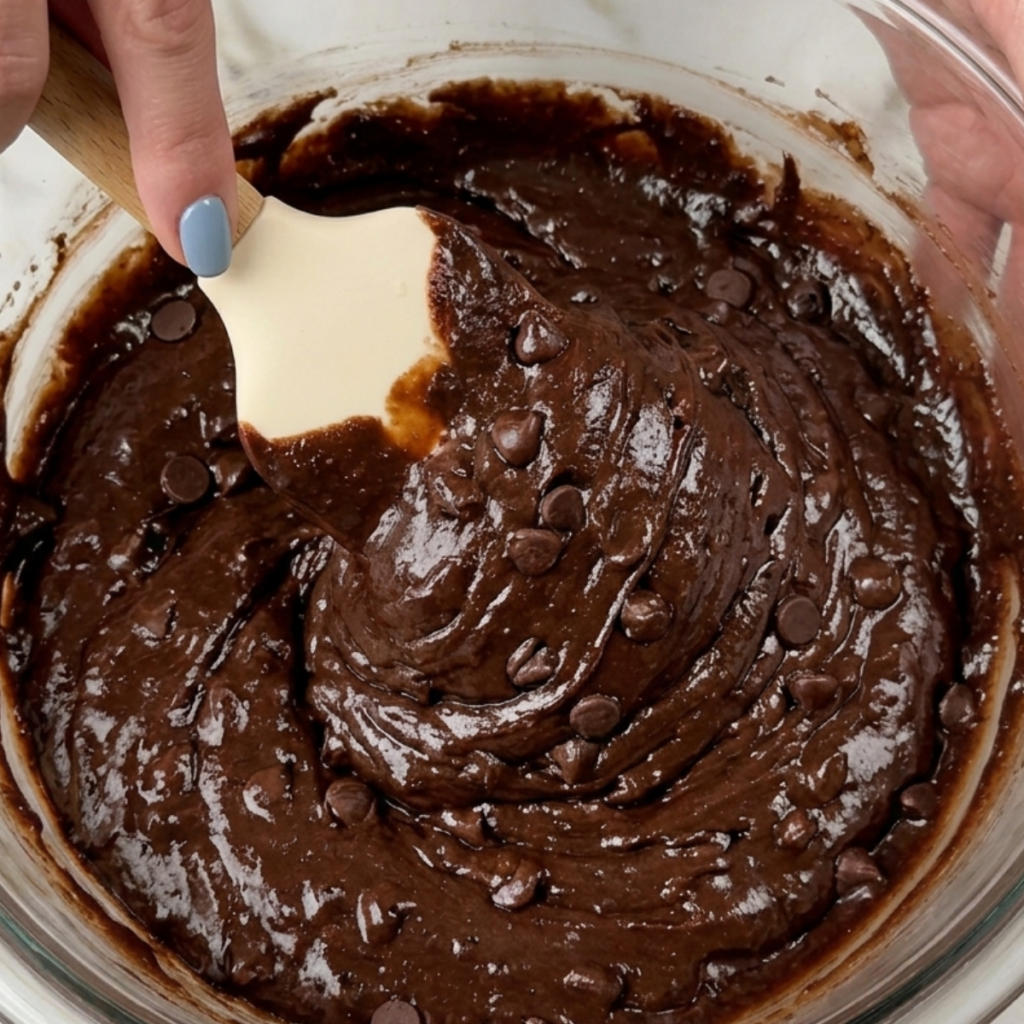
    Step 3: Fold in the Dry Ingredients

    • Sift the flour, cocoa powder, baking powder, and salt directly over the chocolate mixture in the bowl
    • Fold with a spatula using slow, deliberate strokes from the bottom of the bowl upward until no dry streaks remain; do not overmix
    • Fold in the extra chocolate chips so they are evenly distributed throughout the thick, glossy batter
    • Let the batter rest for 10 minutes at room temperature; it will thicken slightly and become easier to scoop into neat rounds

    Step 4: Bake and Finish

    • Preheat your oven to 350 degrees F and line two baking sheets with parchment paper; scoop the batter into rounds about 2 tablespoons each, spacing them 3 inches apart
    • Sprinkle a small pinch of flaky sea salt over the top of each unbaked brownie before they go in the oven
    • Bake for 10 to 12 minutes until the tops are set and crinkled and the edges look firm but the centers still look slightly underdone
    • Let the browkies cool on the pan for at least 10 minutes before moving them; they firm up as they cool and the centers set into that perfect fudgy texture

    Fudgy Chewy Browkies Variations

    Mia’s “Extra Chocolate Chips” Version

    Mia has one position on chocolate chips in baked goods, and that position is “more.” Always more. She once told me very seriously that she could see “empty spots” in a batch of cookies and that it was a problem that needed solving. For Mia’s version, double the fold-in chocolate chips to a full cup and press a few extra chips on top of each scoop before baking. The browkies come out with visible pools of melted chocolate on top that she finds deeply satisfying. I find her deeply satisfying too, honestly.

    Ben’s “Sea Salt and Espresso” Version

    Ben discovered that espresso makes chocolate taste more like chocolate during the strawberry cake baking session, and he has been applying that information to every chocolate recipe ever since. For a more grown-up, intensely flavored brownie, stir one teaspoon of instant espresso powder into the warm melted chocolate before it goes into the batter. The espresso does not make them taste like coffee; it makes them taste like the best version of themselves. Then the flaky sea salt on top seals the whole thing, and Ben calls it “the fancy one.”

    The Peanut Butter Swirl Version

    This one happened by accident when Mia found the peanut butter jar and decided to “help” before I could redirect her. Drop half a teaspoon of creamy peanut butter on top of each brownie round right before they go into the oven, then use a toothpick to swirl it once through the top. It creates this beautiful marbled surface and the peanut butter bakes into a slightly nutty, salty layer that sits right underneath the crinkled chocolate crust. Both kids now request this version specifically, and I pretend it was planned all along.

    Substitutions

    Semi-sweet chocolate to dark chocolate: Dark chocolate at 70 percent or higher gives a less sweet, more intensely bitter chocolate brownie that is genuinely excellent for anyone who loves a bolder flavor. The texture stays exactly the same. Milk chocolate works too but makes a noticeably sweeter, softer result, and the crinkled top is less pronounced.

    Unsalted butter to coconut oil: Refined coconut oil (the kind without a strong coconut flavor) is a solid dairy-free swap here. Use the same quantity melted. The browkies will be very slightly less rich but still deeply fudgy, and the texture difference is minimal enough that most people will not notice.

    All-purpose flour to a 1:1 gluten-free flour blend: A good quality 1:1 gluten-free baking flour works well in this recipe since there is so little flour in the mix to begin with. The browkies may spread slightly more, so let them cool completely on the pan before lifting. Bob’s Red Mill 1:1 is the one I have tested, and it works beautifully.

    Dutch-process cocoa to natural cocoa powder: Natural cocoa will work here, but the color will be a lighter, more reddish brown, and the flavor will be slightly less deep. If using natural cocoa, add a small pinch of baking soda alongside the baking powder to help with the rise since natural cocoa is more acidic than Dutch-process.

    Equipment

    • Two large baking sheets
    • Parchment paper for lining the baking sheets
    • Heatproof bowl for melting the chocolate (or microwave-safe bowl)
    • Small saucepan for the double boiler method
    • Large mixing bowl for the egg and sugar mixture
    • Hand mixer or stand mixer with whisk attachment
    • Rubber spatula for folding
    • Fine mesh sieve or sifter for the dry ingredients
    • Cookie scoop or two tablespoons for portioning
    • Wire cooling rack
    • Kitchen timer (extremely non-negotiable after my volcano conversation incident)

    Storage Tips

    Make Ahead

    • The browkie batter can be made up to 24 hours ahead, covered tightly, and stored in the fridge; let it sit at room temperature for 20 minutes before scooping so it softens enough to portion
    • Scooped unbaked browkie rounds can be frozen on a baking sheet, then transferred to a freezer bag and baked straight from frozen; just add 2 to 3 extra minutes to the bake time
    • Baked browkies can be made a day ahead and stored covered at room temperature; they are arguably even better on day two when the centers have fully set

    Refrigerator

    • Store baked browkies in an airtight container at room temperature for up to 4 days; the refrigerator actually dries them out and is not recommended
    • If you live somewhere very warm and the browkies are softening too much, a brief spell in the fridge is fine but bring them back to room temperature before eating
    • Layer browkies between sheets of parchment paper if stacking in a container to prevent the sticky tops from bonding together

    Freezing

    • Baked browkies freeze beautifully for up to 2 months; wrap each one individually in plastic wrap and then store in a freezer-safe bag
    • Thaw at room temperature for about 30 minutes and they come back almost exactly as they were when freshly baked
    • Do not microwave to thaw unless you want a molten puddle; room temperature thawing is the only way that preserves the fudgy texture

    Reheating

    • A fully cooled browkie warmed in a 300 degree F oven for 4 to 5 minutes comes back to life in the most incredible way; the center goes gooey again and the top re-crisps slightly
    • Microwave reheating works at 50 percent power for 15 to 20 seconds; longer than that and the chocolate chips will overheat and the center will go dry
    • Serve a warm browkie with a cold scoop of vanilla ice cream and nobody in your house will be able to talk for approximately three minutes

    Family Secret Worth Sharing

    The real secret to the crinkled top that makes these browkies look like they came from a fancy bakery display case is something so simple that I almost did not believe it the first time I tried it. You have to let the batter rest. After everything is mixed together, just leave it alone for ten minutes. The batter thickens, the chocolate sets slightly, and when the cookies hit the hot oven, the surface cracks and crinkles in that perfect way while the inside stays dark and fudgy. Ben discovered this while he was waiting impatiently to lick the spatula and decided the ten minutes was “the most important part of the whole recipe.” He is not wrong. He is also not getting the spatula until the timer goes off.

    Troubleshooting FAQs

    My browkies spread into flat puddles instead of staying thick and round. What happened?
    This almost always comes down to one of three things: the chocolate mixture was still too warm when it went into the eggs, the batter was not rested before scooping, or the baking sheets were warm from a previous batch. Make sure the melted chocolate cools for a full 8 to 10 minutes, rest the batter for 10 minutes after mixing, and always use a cool baking sheet. A warm sheet makes the batter start spreading before it even hits the oven.

    Why do my browkies not have the shiny crinkled top?
    The crinkled top comes entirely from whipping the eggs and sugar long enough. Three to four minutes at medium-high speed is the minimum. If you rush this step or do it by hand, the batter will not trap enough air, and the surface will bake up flat and matte instead of shiny and crackled. It is the one step in this recipe that genuinely cannot be shortened.

    The centers are still gooey after the bake time. Are they done?
    Probably yes. The centers should look slightly underdone when they come out of the oven; that is exactly right. They will continue cooking from the residual heat of the pan for the first five minutes out of the oven and then firm up as they cool. If you bake them until the centers look fully set in the oven, they will be dry and cakey by the time they cool. Pull them early and trust the process.

    Can I double this recipe?
    Absolutely, and I do it regularly. Double everything exactly and bake in multiple batches on separate sheets rather than crowding two sheets worth of cookies into the oven at once. Crowded pans and uneven heat are the enemies of a good browkie. Rotate the sheets halfway through baking if your oven has any hot spots, which most home ovens do.

    One Bowl, Two Kids, Zero Leftovers

    Every time I make these, the same thing happens. The browkies come out of the oven looking absolutely perfect with their crinkled tops and glossy centers. I set them on the rack to cool, and then I turn around for approximately forty-five seconds and find Mia already holding one with a completely innocent expression. Ben waits exactly the full ten minutes with the self-control of someone who has been burned before, literally, and then eats three in a row. If you love a one-bowl beginner baking recipe that delivers maximum drama for minimum effort, this is the one to save right alongside our healthy brownie recipe for the days you want something a little lighter. For anyone who loves the brownie-cookie crossover world, our brown butter brookies are the next logical step, and they are just as impossible to stop eating. And on the weeks when I want to put together a full dessert spread that covers every base, these browkies land perfectly next to our banana bread recipe as a crowd-pleaser that disappears before anyone can ask what else is on the table.

    Don’t forget to snap a picture of your fudgy chewy browkies before that… (trust me, it will disappear quickly!), and leave a rating below. We’d love to hear how this fudgy chewy browkies recipe becomes part of your family baking story.

  • Strawberry Chocolate Cake With Fluffy Pink Frosting

    Strawberry Chocolate Cake With Fluffy Pink Frosting

    My first attempt leaned like it was trying to escape the cake stand. I had rushed the cooling, stacked the layers warm, and watched the whole thing tilt left while Ben said, “Mom, it’s moving.” It was moving. We ate it with spoons straight from the pan. But once I nailed it, this strawberry chocolate cake became the most celebrated thing I had ever baked.

    Why This Recipe Is Special

    There is a reason this cake comes out for every birthday, every celebration, and every Tuesday that needs rescuing. The chocolate layers are deeply dark and fudgy with that tender crumb that holds together when you slice it. The strawberry filling is jammy and bright, tucked between each layer like a little surprise. Furthermore, the strawberry whipped frosting is sufficiently light that the entire cake does not feel heavy. Mia calls it her birthday cake even when it is not her birthday, which tells you everything.

    How To Make Strawberry Chocolate Cake

    The cake that actually worked came together on a Saturday afternoon with both kids present and extremely invested. Mia had claimed the role of strawberry washer, which meant she was eating one for every three she put in the bowl. Ben was measuring ingredients with the focused intensity of a scientist, announcing each one out loud as he added it. When those chocolate layers came out of the oven and the whole kitchen filled with that warm, dark cocoa smell, both of them went completely quiet and stood at the oven door like it was a television.

    The lesson that fixed everything was simple: let the cake layers cool completely before you even think about stacking them. I mean completely. Not just warm, not just room temperature on the outside. All the way through. I now put mine on a wire rack for a full hour and then into the fridge for another thirty minutes. It feels like forever when you are excited to eat cake, and Ben will absolutely remind you every ten minutes how long it has been. But a cold, firm layer holds the filling and frosting without sliding, and your cake will stand perfectly straight. Mine does now.

    Main Ingredients

    For the Chocolate Cake Layers

    • 2 cups all-purpose flour – Spoon and level it; packed flour makes a dense, dry cake
    • 2 cups granulated sugar – Sweetness and structure; do not reduce this
    • 3/4 cup Dutch-process cocoa powder – Dutch-process gives a deeper, darker color and less bitter flavor than natural cocoa
    • 2 teaspoons baking soda – Gives the layers their rise; make sure yours is fresh
    • 1 teaspoon baking powder – Works alongside the baking soda for an even, tender crumb
    • 1 teaspoon salt – Enhances the chocolate flavor; do not skip it
    • 2 large eggs, room temperature – Room temperature eggs incorporate more evenly into the batter
    • 1 cup buttermilk, room temperature – Keeps the crumb tender and adds a subtle tang that deepens the chocolate flavor
    • 1 cup hot coffee or hot water – Hot liquid blooms the cocoa and intensifies the chocolate flavor dramatically
    • 1/2 cup neutral oil – Keeps the cake moist for days; vegetable or avocado both work
    • 2 teaspoons vanilla extract – Rounds out all the chocolate notes

    For the Strawberry Filling

    • 2 cups fresh strawberries, hulled and diced – Fresh is best here; frozen releases too much liquid
    • 3 tablespoons granulated sugar – Draws out the juices and helps the filling thicken
    • 1 tablespoon lemon juice – Brightens the strawberry flavor and helps it set
    • 1 tablespoon cornstarch – Thickens the filling so it stays put between the layers

    For the Strawberry Whipped Frosting

    • 2 cups heavy whipping cream, cold – Must be very cold; warm cream will not whip properly
    • 1/2 cup freeze-dried strawberries, crushed to a powder – Gives the frosting its pink color and real strawberry flavor without adding liquid
    • 1/4 cup powdered sugar – Sweetens and stabilizes the whipped cream
    • 1 teaspoon vanilla extract – Rounds out the frosting flavor

    Step-by-Step Instructions

    Step 1: Bake the Chocolate Cake Layers

    • Preheat your oven to 350 degrees F, grease and flour two 9-inch round cake pans, and line the bottoms with parchment paper circles
    • Whisk together the flour, sugar, cocoa powder, baking soda, baking powder, and salt in a large bowl, then add the eggs, buttermilk, oil, and vanilla and mix until just combined
    • Pour in the hot coffee and stir gently until the batter is smooth and glossy; it will be quite thin and that is completely correct
    • Divide the batter evenly between the two pans and bake for 30 to 35 minutes until a toothpick inserted in the center comes out with just a few moist crumbs

    Step 2: Make the Strawberry Filling

    • Combine the diced strawberries, sugar, and lemon juice in a small saucepan over medium heat and stir until the sugar dissolves and the strawberries begin to release their juices
    • Mix the cornstarch with one tablespoon of cold water in a separate small bowl until smooth, then stir it into the simmering strawberry mixture
    • Cook for another 3 to 4 minutes, stirring constantly, until the filling thickens enough to coat the back of a spoon
    • Remove from heat, transfer to a bowl, and let it cool completely to room temperature before using; a warm filling will melt the frosting and slide right out

    Step 3: Make the Strawberry Whipped Frosting

    • Crush the freeze-dried strawberries into a fine powder using a food processor or a zip-lock bag and a rolling pin; the finer the powder, the smoother your frosting will be
    • Combine the cold heavy cream, powdered sugar, crushed freeze-dried strawberries, and vanilla in a large chilled bowl
    • Whip on medium-high speed until stiff peaks form, about 3 to 4 minutes; stop as soon as the peaks hold their shape or the frosting will become grainy
    • Keep the frosting in the fridge until you are ready to assemble so it stays firm and cold

    Step 4: Assemble and Frost the Cake

    • Place one fully cooled cake layer on your cake stand or plate and spread a generous layer of strawberry filling across the top, leaving a half-inch border around the edge
    • Place the second cake layer on top, press down very gently to level it, and apply a thin crumb coat of strawberry frosting all over the outside of the cake
    • Refrigerate the crumb-coated cake for 20 minutes until the first layer of frosting is firm, then apply the final generous layer of frosting using a spatula in loose, swooping strokes
    • Decorate with fresh whole strawberries on top, refrigerate for at least 30 minutes before slicing, and serve cold for the cleanest, most beautiful slices

    Strawberry Chocolate Cake Variations

    Mia’s “More Strawberries Please” Birthday Version

    Mia’s birthday request never changes. She wants extra strawberry filling between every single layer, extra fresh strawberries on top, and what she calls “the pink frosting all the way down the sides so you can see it from across the room.” For her version, I make one and a half batches of the filling and use three cake layers instead of two by slicing one layer in half horizontally. It is a tall, dramatic, unmistakably Mia kind of cake, and she has asked for it every year since she was four.

    Ben’s “Make It a Sheet Cake” Version

    Ben has very practical opinions about cake. He thinks round layer cakes are “too complicated to cut” and once asked if we could “just make it flat.” He is not wrong that a sheet cake version of this recipe is significantly less stressful to assemble. Pour the batter into a greased 9×13 inch pan; bake for 35 to 38 minutes; cool completely; spread the strawberry filling across the top; and pile on the whipped frosting. It tastes identical, and nobody has to worry about anything leaning.

    The Dark Chocolate Strawberry Celebration Version

    For the times when this cake needs to show up to a dinner party or a birthday that deserves something extra, I add a simple dark chocolate ganache drip around the top edge before the fresh strawberries go on. Heat equal parts heavy cream and finely chopped dark chocolate until smooth; let it cool for ten minutes until slightly thickened, then spoon it slowly around the edge of the frosted cake and let it drip naturally down the sides. It looks like it came from a bakery and takes about five minutes.

    Substitutions

    Buttermilk to regular milk plus vinegar: If you do not have buttermilk, add one tablespoon of white vinegar or lemon juice to a measuring cup and fill to the one-cup line with regular whole milk. Let it sit for five minutes until it curdles slightly. It works exactly the same way in the batter and gives you the same tender crumb.

    Hot coffee to hot water: The coffee does not make the cake taste like coffee; it deepens and intensifies the chocolate flavor. If you prefer to skip it entirely, hot water works fine and still blooms the cocoa beautifully. The flavor will be slightly less complex but still deeply chocolatey and delicious.

    Freeze-dried strawberries to strawberry jam: If you cannot find freeze-dried strawberries, you can fold two tablespoons of good-quality strawberry jam into the whipped cream instead. The frosting will be slightly less stable and a paler pink, but the flavor is lovely. Add the jam after the cream has started to thicken so it does not deflate the whole batch.

    Fresh strawberry filling to store-bought jam: On the days when making the filling from scratch feels like one step too many, a good quality strawberry preserve spread straight from the jar works perfectly well between the layers. Warm it slightly so it spreads easily and let it cool back down before stacking. Nobody at your table will know the difference.

    Equipment

    • Two 9-inch round cake pans
    • Parchment paper circles for lining the pans
    • Stand mixer or hand mixer with whisk attachment
    • Large mixing bowl for the cake batter
    • Small saucepan for the strawberry filling
    • Small mixing bowl for the cornstarch slurry
    • Chilled large bowl for whipping the frosting
    • Wire cooling rack
    • Offset spatula for frosting
    • Cake stand or flat serving plate
    • Food processor or zip-lock bag and rolling pin for the freeze-dried strawberries
    • Toothpick for testing doneness
    • Kitchen scale (optional but helpful for even layers)

    Storage Tips

    Make Ahead

    • The chocolate cake layers can be baked up to 2 days ahead, wrapped tightly in plastic wrap, and stored at room temperature or in the fridge until you are ready to assemble
    • The strawberry filling can be made up to 3 days ahead and stored in a sealed jar in the fridge; bring it to room temperature and stir well before using
    • Make the strawberry whipped frosting the same day you plan to frost and serve the cake for the best texture and stability

    Refrigerator

    • Store the assembled cake covered loosely in the fridge for up to 3 days; the frosting holds its shape beautifully when kept cold
    • Slice only what you plan to serve and leave the rest of the cake whole in the fridge with the cut side pressed against a piece of plastic wrap to prevent it from drying out
    • Let refrigerated slices sit at room temperature for 10 minutes before serving so the cake layers soften slightly back to that perfect fudgy texture

    Freezing

    • The unfrosted cake layers freeze beautifully for up to 2 months; wrap each layer individually in plastic wrap and then in foil before freezing
    • Thaw frozen cake layers overnight in the fridge still wrapped, then bring to room temperature before assembling and frosting
    • Do not freeze the assembled cake with the whipped frosting, as it will weep and lose its texture when thawed

    Reheating

    • This cake is served cold or at room temperature and does not need reheating
    • If a slice has been in the fridge, let it sit out for 10 to 15 minutes before eating for the best texture
    • A cold slice with a warm cup of coffee is honestly the only way to eat leftover chocolate cake and I will not be taking questions on that

    Family Secret Worth Sharing

    My mom never used anything other than hot coffee in her chocolate cake batter, and I spent years thinking it was just a quirk of hers until I tried making it with hot water one day and understood immediately. The coffee version tasted like it had a third dimension the water version simply did not have. She always said good chocolate cake should taste like it is trying very hard to be chocolate, and coffee is what makes it try that hard. I told Ben this while we were baking one afternoon, and he thought about it for a moment and then said, “So the cake is secretly a coffee cake?” I told him that was close enough. He seemed satisfied. Mia, who had been listening from the counter, announced that she does not drink coffee and asked if her slice would still be okay. It was more than okay. It always is.

    Troubleshooting FAQs

    Why did my cake layers dome up in the middle instead of baking flat?
    This happens when the oven is too hot or the batter is overmixed. Make sure your oven temperature is accurate with an oven thermometer, and mix the batter only until the ingredients are just combined. You can also use baking strips soaked in water wrapped around the outside of the pans to help the layers bake more evenly and come out flat from the start.

    My strawberry filling is too runny and keeps sliding out from between the layers. What do I do?
    The filling needs to be completely cool and thick before it goes between the layers. If it is still runny after cooling, return it to the saucepan and cook for another two minutes with an extra half teaspoon of cornstarch dissolved in cold water. A thick, jammy filling that holds its shape on a spoon is what you are after. Never use a warm filling on a cake.

    The whipped frosting deflated and turned soupy when I was spreading it. What went wrong?
    Three things cause this: cream that was not cold enough, a bowl that was not chilled, or overworking the frosting after it was whipped. The cream and the bowl both need to be very cold before you start. Once the frosting reaches stiff peaks, stop the mixer immediately and use it right away or keep it in the fridge. Do not try to re-whip deflated cream frosting, as it will not recover.

    Can I make this cake without a stand mixer?
    Absolutely. The cake batter is thin enough to mix by hand with a whisk with no trouble at all. For the whipped frosting, a hand mixer works just as well as a stand mixer; just make sure your bowl and beaters are very cold before you start. Whipping cream by hand is technically possible but takes about ten minutes of serious effort, so the hand mixer is worth it here.

    The Cake That Fixed Everything

    The leaning tower of chocolate cake that started this whole journey is now a family story we tell at every birthday. Ben brings it up every single time I make this, usually while reaching for his second slice. Mia just stands next to the cake stand with a fork, waiting. This strawberry chocolate cake has become the most requested thing I bake, and if you love a showstopping dessert that is equally at home on a celebration table or a random Wednesday, this is absolutely the recipe to save. It sits beautifully alongside our brown butter brookies as a go-to for anyone who wants a dessert that genuinely impresses, and the strawberry-chocolate combination is every bit as classic and crowd-pleasing as our beloved mini pineapple cakes that disappear just as fast. If you are on a baking streak and want something equally beautiful but a little more unexpected, our rhubarb cake recipe is the next one to bookmark. For the days when you want something rich, fudgy, and just a little bit celebratory, this cake is the answer, and it pairs beautifully with a quiet kitchen, a good cup of coffee, and the very satisfying knowledge that it is standing perfectly straight on the stand. I checked. Twice.

    Don’t forget to snap a picture of your strawberry chocolate cake before that… (trust me, it will disappear quickly) and leave a rating below. We’d love to hear how this strawberry chocolate cake becomes part of your family celebration story.

  • Best Asian Pasta Dish With Savory Ground Beef and Glossy Noodle Sauce

    Best Asian Pasta Dish With Savory Ground Beef and Glossy Noodle Sauce

    I dumped in twice as many chili flakes because Mia was asking me seventeen questions about butterflies at the exact wrong moment. Ben took one bite, put his fork down, and said, very calmly, “Mom. I can literally feel my ears”. We ate cereal that night. But once I got the heat right, this Asian pasta dish became the most requested dinner in our entire house.

    Why This Recipe Is Special

    Here is what I love most about this recipe: it looks like something you would order at a restaurant and costs about six dollars to make at home. The sauce is this deep, glossy, savory situation built from pantry staples that come together in the time it takes to boil the pasta. Ground beef soaks up every bit of that garlicky, soy-sesame sauce and clings to the noodles in the most satisfying way. Both kids slurp the noodles completely without shame, and honestly, so do I.

    How To Make Asian Pasta Dish

    The successful version came together on a rainy Thursday when I had exactly one pound of ground beef, a box of spaghetti, and a strong opinion that we were not ordering pizza again. Mia sat on the counter eating green onion slices straight out of the cutting board pile like they were candy. Ben was testing the chopsticks I had set out for serving, which mostly meant he was flicking them at the counter until I gave him a look. When the sauce hit the pan and the garlic and ginger started doing their thing, the whole kitchen transformed. Mia stopped eating the green onions and just sat there sniffing the air with her eyes closed.

    The thing that took this from good to genuinely great was reserving a cup of pasta water before draining. I used to skip this step completely and wonder why my sauce felt a little tight and sticky instead of silky and glossy. The starchy pasta water loosens everything up and helps the sauce coat every single strand evenly. Ben now reminds me every single time I am at the stove. “Did you get the pasta water, Mom?” Yes, buddy. Every time now.

    Main Ingredients

    • 12 oz spaghetti – Regular spaghetti works beautifully here; the long strands catch all that glossy sauce perfectly
    • 1 lb ground beef (80/20) – The fat in 80/20 carries the flavor; leaner beef works but the sauce will be slightly less rich
    • 4 cloves garlic, minced – The backbone of the whole sauce; do not reduce this
    • 1 teaspoon fresh ginger, grated – Adds warmth and that unmistakable Asian flavor depth
    • 3 tablespoons soy sauce – Saltiness and deep umami; low-sodium works fine
    • 2 tablespoons oyster sauce – Thick, sweet, savory and the secret to that glossy restaurant-style coating
    • 1 tablespoon sesame oil – Toasted sesame oil only; it goes in at the end for maximum fragrance
    • 1 tablespoon hoisin sauce – A little sweet, a little tangy; adds complexity without any extra effort
    • 1 teaspoon chili flakes – Start here; add more carefully and not while being asked about butterflies
    • 2 tablespoons neutral oil – For browning the beef; vegetable or avocado oil both work
    • 1 tablespoon brown sugar – Balances the saltiness and helps the sauce develop that glossy caramelized finish
    • 2 tablespoons rice vinegar – Brightens the whole sauce and cuts through the richness
    • 3 green onions, sliced – For finishing and garnish; the fresh bite balances the richness of the sauce
    • 1 teaspoon sesame seeds – Optional but adds a lovely nutty crunch on top
    • 1 cup reserved pasta water – The most important ingredient most people forget; makes the sauce silky

    Step-by-Step Instructions

    Step 1: Cook the Pasta and Make the Sauce

    • Cook the spaghetti in well-salted boiling water until just al dente according to package directions, then scoop out 1 cup of pasta water before draining
    • Whisk together the soy sauce, oyster sauce, hoisin sauce, brown sugar, rice vinegar, and chili flakes in a small bowl until fully combined
    • Set the sauce bowl and reserved pasta water right next to the stove before you start cooking the beef
    • Drain the pasta and toss it with a tiny drizzle of neutral oil to keep it from clumping while you finish the beef

    Step 2: Brown the Beef

    • Heat the neutral oil in a large skillet or wok over medium-high heat until shimmering
    • Add the ground beef and spread it out in a single layer; let it cook undisturbed for 2 minutes before breaking it up so it browns instead of steams
    • Break the beef into small crumbles and cook until deeply browned with no pink remaining, about 5 to 6 minutes total
    • Drain any excess fat from the pan if needed, leaving about 1 tablespoon behind for flavor

    Step 3: Build the Sauce

    • Push the browned beef to one side of the pan and add the garlic and ginger to the cleared space; stir for 30 seconds until golden and fragrant
    • Pour the sauce mixture over the beef and garlic and toss everything together to combine
    • Add the drained pasta directly to the pan and toss vigorously to coat every strand in the sauce
    • Pour in the reserved pasta water a little at a time, tossing as you go, until the sauce turns glossy and clings to the noodles without pooling at the bottom

    Step 4: Finish and Serve

    • Remove the pan from the heat and drizzle the sesame oil over everything, then toss once more to distribute it evenly
    • Taste the noodles and adjust with a splash more soy sauce for salt or a drop more rice vinegar for brightness
    • Divide into bowls and top generously with sliced green onions and a sprinkle of sesame seeds
    • Serve immediately while the noodles are still glossy and the sauce is at its silkiest

    Asian Pasta Dish Variations

    Ben’s “Extra Sauce” Bowl

    Ben has one standard for all noodle dishes: there must be enough sauce to pool slightly at the bottom of the bowl so he can dip each forkful into it before eating. For an extra saucy version that fully satisfies the sauce enthusiasts in your family, double the sauce mixture and add an extra half cup of pasta water. The noodles swim in that glossy, savory coating, and every single bite is completely equal in flavor. Ben considers this the correct way to eat noodles, and I have stopped arguing with him.

    Mia’s “No Spicy Please” Version

    Mia operates a strict no-heat policy in her bowl. She will eat everything else in this dish without complaint, which for a six-year-old is basically a miracle, but the chili flakes are completely non-negotiable. For the spice-free version, simply leave out the chili flakes entirely and add an extra half tablespoon of hoisin sauce to make up for the depth. The dish is still deeply savory and satisfying, and Mia eats the whole bowl without a single negotiation. That alone is worth the small adjustment.

    The Pork and Cabbage Upgrade

    On the weeks when I want to stretch this into something that feels a little more substantial, I swap the ground beef for ground pork and throw in two cups of thinly shredded cabbage with the garlic and ginger. The cabbage wilts down beautifully and adds a slight sweetness that works incredibly well against the salty, savory sauce. It also makes this one of the best easy Asian pasta recipes for feeding a crowd because the whole pot suddenly goes a lot further without feeling thin or skimped on.

    Substitutions

    Ground beef to ground pork or chicken: Ground pork is actually the most traditional choice for this style of noodle dish and gives a slightly sweeter, more delicate flavor. Ground chicken works well too but is leaner, so add an extra teaspoon of sesame oil at the end to keep the richness up.

    Spaghetti to lo mein noodles or udon: If you can find fresh lo mein or udon at your grocery store, absolutely use them here. They have a chewier texture that makes the whole dish feel more authentically Asian-inspired. Cook them according to package directions and treat them exactly the same as the spaghetti.

    Oyster sauce to hoisin sauce: If oyster sauce is not something you keep on hand, use an equal amount of hoisin in its place. The flavor will be slightly sweeter and less briny, so add a small splash of soy sauce to compensate, and the sauce will still be deeply flavorful and glossy.

    Fresh ginger to ground ginger: Fresh ginger is worth it here, but in a pinch, use one quarter teaspoon of ground ginger in place of the full teaspoon of fresh. Ground ginger is more concentrated and will deliver the warmth without the bright, sharp bite of fresh ginger, which is a fair trade on a busy weeknight.

    Equipment

    • Large pot for boiling pasta
    • Large skillet or wok (12-inch minimum; wok preferred for tossing noodles)
    • Small mixing bowl for the sauce
    • Whisk or fork for combining the sauce
    • Ladle or heatproof measuring cup for scooping pasta water
    • Colander for draining pasta
    • Tongs or chopsticks for tossing the noodles
    • Microplane or box grater for fresh ginger
    • Sharp knife and cutting board for green onions and garlic
    • Measuring spoons

    Storage Tips

    Make Ahead

    • The sauce mixture can be whisked together and stored in a sealed jar in the fridge for up to 4 days before you need it
    • Brown the beef a day ahead, store it covered in the fridge, and the whole dish comes together in the time it takes to boil the pasta
    • Cook the spaghetti slightly under al dente if making ahead since it will absorb more sauce and continue softening as it sits

    Refrigerator

    • Store leftover noodles in an airtight container in the fridge for up to 4 days
    • The noodles will absorb the sauce as they sit in the fridge so the leftovers will be less saucy than when freshly made
    • Keep a small splash of soy sauce and water mixed together in a separate container to loosen the noodles back up when reheating

    Freezing

    • The cooked beef with sauce freezes well for up to 2 months in a freezer-safe container
    • Do not freeze the assembled noodles as the pasta texture changes significantly after thawing
    • Freeze the beef component separately and cook fresh noodles when you are ready to serve for the best result

    Reheating

    • Reheat noodles in a skillet over medium heat with a splash of water or soy sauce, tossing constantly until warmed through and glossy again
    • Microwave works in a pinch; cover with a damp paper towel and heat in 60-second intervals, tossing between each round
    • Add a fresh drizzle of sesame oil right before serving reheated leftovers to bring the fragrance back to life

    Family Secret Worth Sharing

    My mom always told me that the secret to good noodles is knowing when to take the pan off the heat. She said most people leave it on too long and the sauce tightens up and loses that silky quality that makes noodle dishes genuinely great. The moment the sauce looks just barely glossy and clings to the noodles without feeling dry, that is the exact second to pull it. I think about that every single time I stand at this pan. Mia asked me once why I always stare at the noodles so seriously right before serving. I told her I was listening to them. She looked at me for a long moment and then said “okay” and went back to eating. That felt like the right answer.

    Troubleshooting FAQs

    Why are my noodles clumping together instead of staying separate?
    This almost always happens when the pasta sits too long after draining without anything to keep it moving. Toss the drained pasta immediately with a tiny drizzle of neutral oil, and get it into the pan with the sauce as quickly as possible. Working fast is the real trick with noodle dishes; the sauce separates the strands and keeps everything loose once everything comes together.

    My sauce is too salty. How do I fix it?
    Add a teaspoon of rice vinegar and a pinch of brown sugar to balance it out. A squeeze of fresh lime juice also works beautifully. If it is still too salty, add a small splash of plain water and toss the noodles well so the dilution distributes evenly through the whole pan.

    The beef came out gray and steamed instead of browned. What went wrong?
    The pan was not hot enough or the beef was too crowded. Ground beef releases a lot of moisture as it cooks, and if the pan is not hot enough to evaporate that moisture quickly, the beef ends up steaming in its own liquid. Make sure the oil is shimmering before the beef goes in, and leave it undisturbed for the first 2 minutes so a proper crust can form before you break it up.

    Can I make this dish without oyster sauce?
    Absolutely. Replace it with an equal amount of hoisin sauce plus a small splash of soy sauce to add back the salty depth. The flavor will be slightly sweeter and less complex but still deeply satisfying. Worcestershire sauce is also a surprising substitute in a pinch, adding a similar savory, slightly sweet depth that works well with the rest of the sauce components.

    Noodle Night Is Now a Thing in Our House

    Thursday nights used to mean scrambled eggs or cereal when I ran out of dinner ideas. Now they mean noodles, chopsticks that Ben still cannot quite figure out, and Mia insisting on eating hers in the biggest bowl we own. This has become one of our favorite easy weeknight dinners right alongside our pineapple chicken and rice that gets just as many requests on a Friday. On the nights when I want something equally fast but with ground beef doing the heavy lifting, our hobo casserole ground beef recipe is always there for me. And if you are on a one-pan weeknight kick like we are, you absolutely cannot miss this easy one pot chicken and rice recipe that has saved us more Thursdays than I can count. Some recipes just quietly become part of your family without you even planning it, and this one did exactly that for us.

    Don’t forget to snap a picture of your Asian pasta dish before that… (trust me, it will disappear quickly!), and leave a rating below. We’d love to hear how this Asian pasta dish becomes part of your family dinner story.

  • 3 Secrets to Perfect Brown Sugar Glazed Salmon

    3 Secrets to Perfect Brown Sugar Glazed Salmon

    The first time I made this, I flipped the salmon too early and left the entire golden crust stuck to my skillet. Ben stared at his plate and said, “Is it supposed to look like that?” It was definitely not. But after a little trial and a lot of butter, this brown sugar glazed salmon came out sticky, caramelized, and absolutely worth every previous failure.

    Why This Recipe Is Special

    Salmon is one of those things that sounds impressive but is genuinely one of the fastest dinners you can pull off on a weeknight. The brown sugar and soy glaze does something almost magical in the oven: it caramelizes into this sticky, lacquered coating that looks like you spent hours in the kitchen when really you spent about thirty minutes including the part where Mia reorganized your spice drawer without being asked. This is the recipe I make when I want dinner to feel like a little event without it actually being one.

    How To Make Brown Sugar Glazed Salmon

    My successful version happened on a Friday night when both kids were hovering at the kitchen counter like little vultures. Mia had appointed herself the official glaze taster and kept dipping her finger into the sauce bowl every time I turned around. Ben was reading the back of the brown sugar bag out loud. This behavior is not helpful, but it is very characteristic of him. When that first wave of caramelized sugar and garlic hit the oven air, they both went completely silent. That kind of quiet only happens when something smells really, really excellent

    The lessons that changed everything were patience and health. I used to rush the sear, moving the fish around before it was ready to be released. Salmon tells you when it is done on the bottom: it will lift cleanly from the pan without any resistance. The moment you have to force it, it is not ready. Once I stopped poking and prodding, the crust formed perfectly, and the glaze had something solid to cling to. Ben now calls himself the “official timer keeper,” which means he stands at the oven door, counting down with tremendous authority.

    Main Ingredients

    • 4 salmon fillets (6 oz each), skin-on – Skin-on keeps the fish together during cooking and crisps up beautifully underneath
    • 3 tablespoons brown sugar, packed – The star of the glaze; dark brown sugar gives a deeper, more molasses-rich flavor than light
    • 2 tablespoons soy sauce – Brings saltiness and umami that balances the sweetness perfectly
    • 1 tablespoon honey – Adds shine and helps the glaze stick and caramelize without burning
    • 3 cloves garlic, minced – Non-negotiable; the garlic blooms in the glaze and gives the whole dish its savory backbone
    • 1 tablespoon olive oil – For searing; gets the pan hot enough for a proper crust
    • 1 tablespoon butter – Added at the end for richness and that glossy restaurant finish
    • 1 teaspoon smoked paprika – Warm, subtle smokiness that complements the sweet glaze beautifully
    • 1/2 teaspoon garlic powder – Layered garlic flavor alongside the fresh; makes the seasoning more complex
    • 1/4 teaspoon black pepper – Freshly ground; a little heat to cut through the sweetness
    • 1/4 teaspoon salt – Season the fish itself before the glaze goes on
    • 1 teaspoon apple cider vinegar – Brightens the glaze and stops it from being one-dimensionally sweet
    • Fresh parsley, chopped – For garnish; adds a clean green finish against that deep caramel color

    Step-by-Step Instructions

    Step 1: Make the Glaze and Season the Salmon

    • Whisk together the brown sugar, soy sauce, honey, minced garlic, and apple cider vinegar in a small bowl until the sugar is mostly dissolved
    • Pat the salmon fillets completely dry on both sides with paper towels; dry fish sears instead of steams
    • Season the flesh side of each fillet with smoked paprika, garlic powder, salt, and black pepper
    • Set the glaze and seasoned salmon side by side near the stove so everything is ready when the pan gets hot

    Step 2: Sear the Salmon

    • Heat the olive oil in an oven-safe skillet over medium-high heat until the oil is shimmering and just beginning to smoke
    • Place the salmon fillets flesh-side down in the pan and cook for 3 minutes without moving them at all
    • Flip the fillets gently once they release cleanly from the pan; if they resist, give them another 30 seconds
    • Cook for another 2 minutes on the skin side until the skin is golden and beginning to crisp

    Step 3: Glaze and Bake

    • Spoon the brown sugar glaze generously over each fillet while the skillet is still on the stovetop, coating the tops and sides well
    • Transfer the whole skillet directly into a preheated 400 degree F oven and bake for 3 to 4 minutes
    • Pull the pan out halfway and spoon the remaining glaze over each fillet for that second caramelized layer
    • Return to the oven for another 3 to 4 minutes until the glaze is bubbling, sticky, and deeply caramelized

    Step 4: Rest and Serve

    • Let the salmon rest in the pan for 2 minutes before serving so the juices redistribute and the glaze sets slightly
    • Use a wide spatula to lift each fillet carefully and transfer to serving plates with the caramelized side facing up
    • Spoon any remaining pan glaze over the top of each piece for maximum flavor and shine
    • Finish with freshly chopped parsley and serve immediately while the glaze is still warm and glossy

    Brown Sugar Glazed Salmon Variations

    Mia’s “Make It Sweeter” Version

    Mia has a serious sweet tooth, and the moment she tasted the original glaze, she asked if we could add more honey. We could, and we did. For a sweeter, more dessert-adjacent glaze that kids absolutely lose their minds over, increase the honey to 2 tablespoons and add a small pinch of cinnamon to the mix. It gives the whole thing a warmth that Mia describes as “cozy salmon,” which is genuinely the best product description I have ever heard. Serve it over white rice and watch it disappear.

    Ben’s “Spicy Brown Sugar” Version

    Ben went through his spicy phase at age eight and never fully came out of it. For those who like a little heat against that sweet glaze, add half a teaspoon of sriracha and a pinch of red pepper flakes directly into the glaze mixture before spooning it over the salmon. The heat builds slowly underneath all that sweetness and turns this into a genuinely grown-up version of the dish. Ben adds extra red pepper flakes to his own plate, always, and then immediately reaches for his water glass.

    The Sheet Pan Sunday Version

    On the Sundays when I do not want to deal with a hot skillet and oven transfer, I skip the sear entirely and go straight to a lined sheet pan. Brush the fillets with a little oil, season them, spoon the glaze over the top, and bake at 425 degrees F for 12 to 14 minutes. You lose a little of that deep stovetop crust, but the glaze still caramelizes beautifully, and the cleanup takes about forty-five seconds. Both kids can help line the pan and spoon the glaze, which means dinner becomes a group project.

    Substitutions

    Brown sugar to maple syrup: Pure maple syrup makes a genuinely beautiful swap here. Use 2 tablespoons in place of the 3 tablespoons of brown sugar since maple syrup is slightly sweeter and more liquid. The flavor is a little earthier and less molasses-forward, but the caramelization is just as gorgeous in the oven.

    Soy sauce to tamari or coconut aminos: Tamari is the easiest gluten-free swap with an almost identical flavor. Coconut aminos are sweeter and less salty, so reduce the honey by half a teaspoon if you go that route. Both work beautifully in the glaze without changing the overall balance much.

    Fresh garlic to garlic powder: If you are out of fresh garlic, use 1 teaspoon of garlic powder in the glaze instead of the 3 minced cloves. The flavor is less sharp and more mellow, which actually works well for kids who find raw garlic a little strong. The dish still tastes deeply savory and completely intentional.

    Salmon to trout or arctic char: Both trout and arctic char have a similar fat content and mild flavor to salmon and respond beautifully to this glaze. Trout fillets tend to be thinner, so reduce the oven time to 4 to 5 minutes and watch closely. The brown sugar glaze works on any rich, fatty fish that can handle high heat without drying out.

    Equipment

    • Oven-safe skillet (cast iron or stainless steel, 12-inch)
    • Small mixing bowl for the glaze
    • Whisk or fork for mixing the glaze
    • Paper towels for drying the salmon
    • Wide fish spatula for flipping and serving
    • Tongs (optional but helpful for positioning fillets)
    • Measuring spoons
    • Oven mitts (the skillet handle will be extremely hot coming out of the oven)
    • Basting spoon or pastry brush for applying the glaze
    • Instant-read thermometer (salmon is done at 125 to 130 degrees F for medium)

    Storage Tips

    Make Ahead

    • The brown sugar glaze can be made up to 3 days in advance and stored in a sealed jar in the fridge; give it a good stir before using since the sugar may settle
    • Season the salmon fillets the night before and keep them covered in the fridge for up to 24 hours before cooking
    • Do not glaze the salmon ahead of cooking; the sugar draws moisture out of the fish and can make the texture soft before it even hits the pan

    Refrigerator

    • Store leftover cooked salmon in an airtight container in the fridge for up to 3 days
    • The glaze firms up when cold and turns into a beautiful sticky coating on the fish; it is honestly delicious cold over a salad the next day
    • Keep leftover pan sauce in a separate small container and drizzle it over the reheated salmon before serving

    Freezing

    • Cooked glazed salmon can be frozen for up to 1 month wrapped tightly in plastic wrap and then placed in a freezer bag
    • The texture changes slightly after freezing but the flavor holds up remarkably well, especially flaked into pasta or rice bowls
    • Raw salmon fillets freeze beautifully for up to 3 months; thaw overnight in the fridge before seasoning and cooking

    Reheating

    • Reheat leftover salmon gently in a covered skillet over low heat with a splash of water to prevent the glaze from burning
    • Oven reheating at 275 degrees F for 10 to 12 minutes keeps the fish moist and warms it through without overcooking
    • Microwave reheating works in a pinch on 50 percent power in 60-second intervals; cover with a damp paper towel to hold in moisture

    Family Secret Worth Sharing

    My mom taught me something about glazed fish that I thought was fussy until it changed every recipe I made after: always add your glaze in two rounds. Put half on before it goes in the oven, then pull the pan out halfway through cooking and spoon the second half over the top. The first layer soaks into the fish and seasons it all the way through. The second layer stays on the surface and caramelizes into that glossy, sticky coating you see in all the pictures. Mia watched me do it once and asked why I was “painting the fish.” I told her Grandma taught me. She nodded like that explained everything, which, honestly, it did.

    Troubleshooting FAQs

    Why is my glaze burning in the oven instead of caramelizing?
    Two things usually cause this: oven temperature too high or too much sugar in the glaze without enough liquid to balance it. Make sure your oven is at 400 degrees F and not higher for the finishing bake. If the glaze is darkening too fast, tent the pan loosely with foil for the last few minutes. A little char on the very edges is normal and delicious; black and bitter means it went too far.

    My salmon is sticking to the pan when I try to flip it. What do I do?
    Do not force it. This is the single most important salmon rule I know. If the fish is sticking, it is not ready to flip yet. Give it another 30 to 60 seconds and try again with a thin fish spatula. Properly seared salmon releases on its own when the crust has fully formed. A well-seasoned cast iron skillet or a hot stainless steel pan with enough oil also makes a big difference.

    How do I know when the salmon is cooked through without cutting into it?
    The most reliable way is an instant-read thermometer. Pull the salmon at 125 to 130 degrees F for medium, which is slightly translucent in the very center, or 145 degrees F for fully cooked. Visually, the flesh should change from deep pink to a lighter, opaque pink from the outside in. When you press the thickest part gently with your finger, it should feel firm but with a little give.

    Can I make this without an oven-safe skillet?
    Absolutely. Sear the salmon in any skillet you have, then transfer the fillets to a parchment-lined baking sheet, spoon the glaze over the top, and finish in the oven from there. You lose the easy pan sauce that forms in a single-skillet method, but the glazed salmon comes out just as beautiful, and the cleanup is actually easier.

    Sticky Fingers, Happy Table

    Friday nights in our kitchen have a new look now. Ben picks off every piece of parsley with surgical precision. Mia drags her rice through the leftover pan glaze like it is the best thing she has ever tasted, which some weeks it genuinely is. This brown sugar-glazed salmon has quietly become one of our most loved baked salmon recipes in the whole dinner rotation, sitting right alongside the other easy salmon glaze recipes we reach for when we need something that feels special on a Tuesday. If you are looking for a reliable, crowd-pleasing honey garlic brown sugar salmon that comes together in under thirty minutes and makes the whole house smell incredible, this is absolutely the one to save. Some dinners are just worth the sticky pan.

    Don’t forget to snap a picture of your brown sugar-glazed salmon before that… (trust me, it will disappear quickly!), and leave a rating below. We’d love to hear how this brown sugar glazed salmon becomes part of your family dinner story.

    Star rate this recipe and join our warm kitchen family.

  • 3 Secrets to the Best Roasted Vegetable Bowls Healthy

    3 Secrets to the Best Roasted Vegetable Bowls Healthy

    I set off the smoke alarm twice while trying to roast the vegetables. Twice. I forgot about both pans while helping Ben with his spelling words and walked back to a pure kitchen disaster. Mia wandered in, sniffed the smoky air, and announced, “Something smells like school lunch. ” That was not a compliment. Once I figured it out, these roasted vegetable bowls healthy enough for any weeknight, became everything.

    Why This Recipe Is Special

    Here is the thing nobody tells you about roasted vegetables: when you get them right, even the kids who make dramatic gagging sounds at the word “broccoli” will eat them without complaint. Ben, my nine-year-old, once described these bowls as “actually pretty good for something healthy,” which in our house is a standing ovation. This recipe is filling, flexible, and genuinely one of the best ways I know to get a real vegetable-focused dinner on the table without spending an hour in the kitchen.

    How To Make Roasted Vegetable Bowls Healthy

    My first real successful attempt happened on a Tuesday in January when I was determined to stop ordering delivery. I had Mia sitting on the counter eating a handful of raw chickpeas straight from the can (she does this; I have accepted it) and Ben reading the ingredient list over my shoulder like a tiny food critic. When the first tray came out of the oven smelling like golden caramelized edges and warm spices, Mia slid off the counter and pressed her nose up to the pan. “Can I eat just the potatoes?” she asked. Reader, she ate the broccoli too.

    The big lesson from my burnt-vegetable disaster days was simple: do not crowd the pan. I used to pile everything onto one baking sheet thinking it would save time, and what I got instead was sad, steamed vegetables sitting in their liquid. Spread them out, give them space, and let the oven do its job. Two sheet pans, side by side, changed everything. Ben now calls himself the “spreader,” which mostly means he arranges the vegetables with the focused intensity of someone doing surgery.

    Main Ingredients

    • 2 cups broccoli florets – Gets beautifully crispy at the edges; cut them similar in size so they roast evenly
    • 2 cups baby potatoes, halved – The golden, crispy base of the bowl; creamy inside, caramelized outside
    • 1.5 cups butternut squash, cubed – Adds natural sweetness and gorgeous color; cut into 3/4-inch pieces
    • 1 cup chickpeas, drained and dried – Your protein hero: they turn irresistibly crunchy in the oven
    • 3 tablespoons olive oil – Coats everything evenly and helps achieve that golden roast
    • 1 teaspoon garlic powder – Warm, savory backbone for the whole bowl
    • 1 teaspoon smoked paprika – Gives everything that deep, slightly smoky color and flavor
    • 1/2 teaspoon cumin – Earthy warmth that ties all the vegetables together
    • Salt and black pepper to taste – Season generously; vegetables need more salt than you think
    • For the tahini drizzle: 3 tablespoons tahini – Nutty, creamy, and the sauce that makes this bowl feel complete
    • 2 tablespoons lemon juice – Brightens the tahini and cuts through the richness
    • 1 tablespoon olive oil – Loosens the sauce to a drizzleable consistency
    • 2 to 3 tablespoons warm water – Thins the tahini sauce to just the right pourable texture
    • Fresh parsley, chopped – For garnish; adds color and a clean, fresh finish
    • Red pepper flakes – Optional, for a little heat on top

    Step-by-Step Instructions

    Step 1: Prep and Season the Vegetables

    • Preheat your oven to 425 degrees F and line two large baking sheets with parchment paper
    • Pat the chickpeas completely dry with paper towels; moisture is the enemy of crunch
    • Toss the broccoli, potatoes, squash, and chickpeas separately with olive oil, garlic powder, smoked paprika, cumin, salt, and pepper
    • Keep the chickpeas on their own section of the pan since they roast faster than the root vegetables

    Step 2: Roast the Vegetables

    • Spread everything across two baking sheets in a single layer with space between each piece
    • Place potatoes and squash on one pan, broccoli and chickpeas on the second pan
    • Roast at 425 degrees F for 25 to 30 minutes, flipping everything once halfway through
    • Remove the broccoli and chickpeas at 20 to 22 minutes if they are browning faster than the root vegetables

    Step 3: Make the Tahini Sauce

    • Whisk together the tahini, lemon juice, and olive oil in a small bowl until smooth
    • Add warm water one tablespoon at a time, whisking between each addition until the sauce is pourable but not thin
    • Taste and adjust with a pinch of salt or extra lemon juice to your preference
    • Set aside at room temperature; the sauce will thicken slightly as it sits so keep the warm water nearby

    Step 4: Assemble the Bowls

    • Start with a base of your choice: cooked grains, leafy greens, or simply the roasted potatoes as the foundation
    • Layer the roasted broccoli, squash, and crispy chickpeas over the top
    • Drizzle the tahini sauce generously across everything in a slow zigzag
    • Finish with fresh parsley and a pinch of red pepper flakes, and serve immediately while everything is still warm

    Roasted Vegetable Bowls Healthy Variations

    Ben’s “Make It a Grain Bowl” Version

    Ben went through a phase where everything had to have quinoa in it after he learned it was a “complete protein” from a school project. He told me the news very seriously while pointing at the bag like a tiny nutritionist. For a heartier bowl that keeps hungry kids full through homework and after-school activities, serve everything over a cup of cooked quinoa or brown rice. The grains soak up the tahini sauce in the most satisfying way and turn this into a real meal-prep-with-lots-of-veggies situation for the week ahead.

    Mia’s “Everything Crispy” Bowl

    Mia has one rule in life: texture matters. She will reject anything soft, mushy, or what she calls “too wet.” For the crunch-obsessed members of your household, double the chickpeas, add a handful of pumpkin seeds to the pan in the last five minutes of roasting, and swap the tahini drizzle for a lemon-herb yogurt sauce instead. Everything gets that satisfying crunch that makes Mia eat her vegetables without a single negotiation.

    The “Clean Out the Fridge” Sunday Version

    This is honestly how the recipe started. I had half a head of cauliflower, some sad carrots, and a sweet potato that was on its last good day. Everything got tossed with the same spice mix and roasted together. The rule is simple: any vegetable that can survive 425 degrees F for 25 minutes is fair game. Zucchini, bell peppers, red onion, Brussels sprouts, and green beans all work beautifully. This dish is my favorite kind of hearty vegetable meal because the recipe changes every single week.

    Substitutions

    Butternut squash to sweet potato: Sweet potato is actually my go-to swap when I cannot find squash. It roasts in almost the same time and has a similar natural sweetness, and Mia cannot tell the difference. Cut it into the same size cubes for even cooking.

    Tahini sauce to hummus drizzle: If tahini is not something you keep on hand, thin out two tablespoons of store-bought hummus with a little lemon juice and olive oil until it is pourable. It gives you a similar creamy, savory finish with zero extra effort.

    Chickpeas to white beans: White beans roast up beautifully and give you a slightly softer, creamier bite compared to the crunch of chickpeas. They are also a wonderful option if someone in your house has a texture preference. Dry them well before roasting, just like you would chickpeas.

    Smoked paprika to regular paprika plus a pinch of cayenne: If you only have sweet paprika in your spice rack, add just a tiny pinch of cayenne alongside it to recreate that subtle smoky warmth. Start small since cayenne is much hotter than smoked paprika and builds quickly.

    Equipment

    • Two large rimmed baking sheets (half sheet pans are ideal)
    • Parchment paper or silicone baking mats
    • Large mixing bowl for tossing the vegetables
    • Small mixing bowl for the tahini sauce
    • Whisk
    • Sharp chef’s knife and cutting board
    • Vegetable peeler for the squash
    • Paper towels for drying the chickpeas
    • Measuring spoons
    • Tongs or a wide spatula for flipping
    • Timer (non-negotiable after my two-pan smoke alarm situation)

    Storage Tips

    Make Ahead

    • Chop all your vegetables up to two days ahead and store them in separate airtight containers in the fridge
    • The tahini sauce can be made three days in advance; store it in a sealed jar and whisk in a splash of warm water before serving to loosen it back up
    • This recipe is one of the best veggie food prep options out there; roast a double batch on Sunday and you have four days of easy lunches sorted

    Refrigerator

    • Store roasted vegetables in an airtight container in the fridge for up to 4 days
    • Keep the tahini sauce in a separate container so it does not make the vegetables soggy
    • The chickpeas will soften over time in the fridge, so re-crisp them in a dry skillet for two minutes before serving if you want that crunch back

    Freezing

    • Roasted potatoes and squash freeze reasonably well for up to 6 weeks in a freezer-safe bag
    • Broccoli and chickpeas do not freeze well after roasting because they lose their texture completely, so freeze those components raw instead
    • Do not freeze the tahini sauce; make it fresh each time since it takes less than three minutes

    Reheating

    • The best way to reheat roasted vegetables is back in the oven at 400 degrees F for 8 to 10 minutes so they crisp back up
    • Microwave reheating works in a pinch but the vegetables will be softer; spread them on a plate in a single layer and heat in 60-second bursts
    • A hot skillet with a tiny drizzle of olive oil for two to three minutes brings back a lot of the original roasted texture and flavor

    Family Secret Worth Sharing

    My mom always said the difference between good roasted vegetables and great ones is what you do in the last five minutes. She would pull the pan out just before everything was done, drizzle a tiny bit of honey over the squash and carrots, and slide it back in for one final burst. The sugars caramelize just enough to turn those last few minutes into something magical. I tried it once on a whim while Ben was watching, and he grabbed a piece of squash straight off the hot pan, burned his fingers, and said it was “worth it.” My mom would have loved that kid.

    Troubleshooting FAQs

    Why are my roasted vegetables coming out soggy instead of crispy?
    Three things cause soggy vegetables every time: a crowded pan, too much oil, or vegetables that were not dried properly. Make sure every piece has space around it, use just enough oil to lightly coat each piece, and if you washed the vegetables before roasting, dry them thoroughly. Even a little surface moisture steams the vegetables instead of letting them roast.

    My chickpeas are not getting crunchy. What am I doing wrong?
    The number one culprit is moisture. Canned chickpeas need to be drained, rinsed, and then patted aggressively dry with paper towels. Spread them on the pan with space around each one and do not stir them too often; let them sit and develop a crust. Some brands of canned chickpeas are waterlogged and may need an extra five minutes in the oven.

    Can I use frozen vegetables instead of fresh?
    You can, but they need one extra step. Spread the frozen vegetables on a baking sheet and let them thaw at room temperature for 20 minutes, then blot dry with paper towels before tossing with oil and spices. Frozen vegetables carry a lot of extra moisture that will steam everything if you put them in the oven straight from the bag.

    The tahini sauce seized up and turned into a paste. How do I fix it?
    This happens to everyone the first time, and it is completely normal. Tahini thickens dramatically when it first meets acid like lemon juice. Keep whisking and add warm water one tablespoon at a time, whisking between each addition. It will loosen up into a smooth, creamy sauce. Cold water makes it seize even more, so always use warm.

    A Bowl Full of Good and a Kitchen Full of Noise

    These days, Tuesday night in our kitchen smells like smoked paprika and toasted chickpeas, and I genuinely could not be happier about it. Mia picks out the squash and eats it first. Ben arranges his bowl in sections so nothing touches, which tells you everything you need to know about him. This has become one of our favorite low fat veggie recipes that actually satisfies everyone at the table, right alongside the other roasted vegetables dinner meals we rotate through the week. Whenever someone asks me what to eat with roasted vegetables, I always say: make it a bowl, add a good sauce, and do not underestimate how much a little crunch changes everything. These are the kinds of hearty vegetable meals that make you feel like you are genuinely taking care of your family, one messy, noisy, wonderful Tuesday at a time.

    Don’t forget to snap a picture of your roasted vegetable bowls healthy before that… (trust me, it will disappear quickly!), and leave a rating below. We’d love to hear how this roasted vegetable bowls healthy recipe becomes part of your family dinner story.

    Star rate this recipe and join our warm kitchen family.

  • The Best Pineapple Chicken and Rice

    The Best Pineapple Chicken and Rice

    It started with a smoke alarm, a very dramatic six-year-old, and what can only be described as chicken jerky. I was heated too high, got distracted by a homework crisis, and came back to find my beautiful pineapple chicken and rice looking like a sad campfire story. Mia fanned the air with a folder. Ben said, very seriously, “Mom, I don’t think we should eat that.” We ordered pizza.

    Why This Recipe Is Special

    But here is the thing about cooking with your kids watching: they remember everything. The week after my little disaster, Ben asked if we could “try the pineapple chicken again, but maybe not burnt this time.” That completely unsolicited vote of confidence is what got me back in the kitchen. This dish is sweet, sticky, a little caramelized, and packed with flavor that feels like takeout but better. It is our Friday night tradition now, and both kids ask for it by name.

    How To Make Pineapple Chicken and Rice

    My first real attempt (the successful one, not the smoke alarm incident) taught me something important: patience. I was rushing, as usual, with Mia sitting on the counter and Ben reading over my shoulder, narrating every step like a sports commentator. When the sauce hit the hot pan and that caramelized pineapple smell filled the kitchen, Mia announced, “It smells like a vacation.” Ben immediately countered, “It smells like Hawaii.” We had never been to Hawaii. I told them that was precisely the point.

    The turning point was learning to dry the chicken pieces really well before they hit the pan. My first burnt attempt? I had skipped that step entirely. Wet chicken steams instead of sears, and you end up with sad, gray pieces instead of those gorgeous caramelized edges. Ben now considers himself the official chicken-patting expert, which means he stands on a step stool with a paper towel looking very pleased with himself.

    Main Ingredients

    • 1.5 lbs boneless, skinless chicken thighs, cut into 1-inch pieces: Thighs stay juicy even if you pull them a minute late; breasts dry out fast
    • 1.5 cups long-grain white rice: The starchy base that soaks up every drop of that sticky sauce
    • 1 can (20 oz) pineapple chunks in juice, drained (juice reserved): The juice goes in the sauce; canned is more consistent than fresh here
    • 3 tablespoons soy sauce: Depth and saltiness; use low-sodium if you are watching salt
    • 2 tablespoons honey: Brings the sticky glaze; do not skip or substitute with maple syrup for this one
    • 1 tablespoon rice vinegar: Brightens the whole sauce and balances the sweetness
    • 1 tablespoon sesame oil: Adds that unmistakable toasty aroma; a little goes a long way
    • 3 cloves garlic, minced: Non-negotiable flavor backbone
    • 1 teaspoon fresh ginger, grated: Gives the dish its warmth; ground ginger works in a pinch
    • 1 tablespoon cornstarch: Thickens the sauce into that glossy, clingy glaze
    • 2 tablespoons neutral oil (vegetable or avocado) – High smoke point so you get a proper sear
    • Salt and black pepper: Season the chicken before it hits the pan
    • Fresh cilantro for garnish: Optional but highly recommended; my kids pick it off and I eat theirs

    Step-by-Step Instructions

    Step 1: Make Your Sauce

    • Whisk together the soy sauce, honey, rice vinegar, and sesame oil in a small bowl
    • Add 3 tablespoons of the reserved pineapple juice and stir to combine
    • Whisk in the cornstarch until completely smooth with no lumps
    • Set aside close to the stove so it is ready when you need it

    Step 2: Cook the Rice

    • Rinse the rice in cold water until it runs mostly clear, about 30 seconds
    • Combine rice with 3 cups of water in a saucepan, bring to a boil, then reduce to a simmer
    • Cover and cook on low heat for 18 minutes without lifting the lid
    • Remove from heat and let it steam, still covered, for another 5 minutes

    Step 3: Sear the Chicken

    • Pat the chicken pieces completely dry with paper towels, then season generously with salt and pepper
    • Heat the neutral oil in a large skillet or wok over medium-high heat until shimmering
    • Add the chicken in a single layer and work in two batches if pieces are crowding the pan
    • Cook 3 to 4 minutes per side without moving until deeply golden, then remove and set aside

    Step 4: Build the Dish

    • In the same pan, sauté the garlic and ginger for 30 seconds until fragrant
    • Add the pineapple chunks and cook for 2 minutes until they pick up some color on the edges
    • Return the chicken to the pan, pour the sauce over everything, and toss to coat
    • Cook for another 2 to 3 minutes, stirring gently, until the sauce thickens and coats every piece

    Pineapple Chicken and Rice Variations

    The “Make It Spicy, Mom” Version

    Ben went through a phase at age seven where everything had to be spicy. He had zero tolerance for actual heat but insisted on asking for it anyway. For those of you with braver palates (or braver kids), add a tablespoon of sriracha or chili garlic sauce directly into the sauce mixture. A pinch of red pepper flakes in the pan with the garlic also does the trick. The sweet pineapple plays beautifully against the heat.

    Mia’s No-Cilantro, Extra-Pineapple Bowl

    Mia has very strong opinions about cilantro. She says it tastes like “soap and sadness,” which is honestly fair. For the cilantro-averse members of your family, skip it entirely and double the pineapple chunks for a sweeter, fruitier result. She also likes hers served with the rice on the side instead of mixed in, which she calls “fancy restaurant style.”

    The Weeknight Sheet Pan Remix

    On the nights when even standing at the stove feels like too much, I skip the skillet entirely. Toss the marinated chicken and pineapple chunks on a sheet pan, roast at 425 degrees Fahrenheit for 20 to 22 minutes, then drizzle the sauce (cooked separately in a small saucepan for 2 minutes) over the top. You lose a little of the caramelization magic, but the cleanup is a dream, and the kids can help lay everything out on the pan.

    Substitutions

    Chicken thighs to chicken breast: Totally doable, but reduce the cooking time by about one minute per side and pull them off the heat the moment they are cooked through. Breast meat punishes you for overcooking.

    Fresh pineapple to canned pineapple chunks: Fresh pineapple is beautiful here, but it releases more liquid. If using fresh, pat those chunks dry, just like you do the chicken, or your sauce will be thin. About 2 cups of fresh chunks equals one standard can.

    Soy sauce to tamari or coconut aminos: Tamari is a great gluten-free swap with an almost identical flavor. Coconut aminos are sweeter and less salty, so taste as you go and reduce the honey slightly if you make that switch.

    White rice to jasmine or brown rice: Jasmine rice is actually my preference. It has a slightly floral quality that echoes the pineapple. Brown rice works too; just cook it separately according to package directions since it takes much longer than white.

    Equipment

    • Large skillet or wok (12-inch minimum) with a lid
    • Medium saucepan for rice
    • Small mixing bowl for the sauce
    • Whisk
    • Cutting board and sharp chef’s knife
    • Microplane or box grater for fresh ginger
    • Paper towels for patting the chicken dry
    • Tongs
    • Measuring spoons and a liquid measuring cup
    • Step stool (if your six-year-old insists on being the official chicken-pat supervisor)

    Storage Tips

    Make Ahead

    • The sauce can be whisked together and stored in a sealed jar in the fridge for up to 3 days before you need it
    • Chop and portion your chicken a day ahead and keep it covered in the fridge
    • Cook a big batch of rice at the start of the week; leftover rice actually fries and sauces better than freshly cooked

    Refrigerator

    • Store leftovers in an airtight container in the fridge for up to 4 days
    • Keep the rice and chicken separate if possible; rice stored with the saucy chicken soaks up all the liquid and gets a little mushy
    • Let everything cool completely before sealing to avoid condensation

    Freezing

    • The chicken and sauce freeze beautifully for up to 2 months in a freezer-safe container
    • Rice freezes well too; portion it into individual servings in freezer bags, pressing flat to save space
    • Do not freeze fresh cilantro garnish; add it fresh when you reheat and serve

    Reheating

    • Reheat the chicken gently in a covered skillet over medium-low heat with a splash of water or pineapple juice to loosen the sauce
    • Microwave works in a pinch; cover with a damp paper towel and heat in 90-second increments, stirring in between
    • For rice, a few drops of water before microwaving prevents that sad, hard clump situation

    Family Secret Worth Sharing

    The real secret to this dish comes straight from something my mom used to do, which I thought was weird until I tried it myself: she always added a tiny bit of reserved pineapple juice to the rice cooking water instead of using plain water. Not all of it, just a couple tablespoons. The rice comes out with this barely-there sweetness that you cannot quite identify but absolutely notice. Ben figured it out one night and demanded I tell him what I did differently. When I explained, he looked at me with the most serious face and said, “Grandma was a genius.” She really was.

    Troubleshooting FAQs

    Why is my sauce not thickening into a glaze?
    The most common culprit is not enough heat or too much liquid. Make sure your pan is on medium-high when you add the sauce, and if you used fresh pineapple, it likely released extra juice. Give it an extra minute or two, stirring constantly. If it still will not tighten up, mix half a teaspoon of cornstarch with a teaspoon of cold water and stir it in.

    My chicken is cooked through, but there is no golden crust. What happened?
    Two things cause this: crowding the pan and wet chicken. If pieces are touching, they steam instead of sear. Work in batches, leave space between each piece, and make absolutely sure you have patted every surface dry with paper towels before seasoning. A dry surface is what creates that caramelized, golden crust.

    The dish came out way too sweet. How do I balance it?
    Add an extra teaspoon of rice vinegar or a small squeeze of fresh lime juice right at the end. A little more soy sauce also helps pull things back into balance. If you used sweetened pineapple juice instead of the unsweetened reserved juice from the can, that is likely the cause. Always check the label.

    Can I make this in a slow cooker for a busy day?
    Yes, with a small adjustment: sear the chicken first in a skillet for color and flavor, then transfer everything to the slow cooker with the sauce. Cook on low for 3 to 4 hours. The texture is softer and less caramelized than the stovetop version, but it is still deeply flavorful and incredibly hands-off. Add the cornstarch slurry in the last 20 minutes with the lid cracked to let it thicken.

    From Our Table to Yours

    Friday nights in our house smell like pineapple and soy sauce now, and honestly I would not have it any other way. There is something about watching Mia push the cilantro to the edge of her bowl with this long-suffering expression and Ben announcing the meal is “restaurant quality” with rice on his chin that makes all of it feel exactly right. This pineapple chicken and rice sits alongside our beloved easy chicken dinner recipes and has honestly become one of our most requested Asian dishes in the regular rotation. Whenever I need a crowd-pleaser that lands somewhere between comfort food and something that feels a little special, this is the one I reach for, right up there with our other favorite chicken and rice dishes that have carried us through busy school weeks and lazy Sunday nights alike.

    Please remember to snap a picture of your pineapple chicken and rice before that… (trust me, it will disappear quickly!), and leave a rating below. We’d love to hear how this pineapple chicken and rice becomes part of your family dinner story.

    Star rate this recipe and join our warm kitchen family.

  • Easy Baked Cod: The Flavourful Mediterranean Fish Dinner

    Easy Baked Cod: The Flavourful Mediterranean Fish Dinner

    Mia came downstairs, stopped halfway, and said it smelled like the fish counter at the supermarket but sadder. I had forgotten to add anything: no lemon, no herbs, no tomatoes, no olive oil, just cod in a bare baking dish sitting in its regret. Leo tried a corner piece and said nothing, which was a full verdict. My baked cod had zero personality. Noted.

    Why This Recipe Is Special

    Cod is one of those fish that asks very little of you and rewards you generously when you give it something to work with. On its own it is mild, clean, and almost neutral. But buried under a tangle of cherry tomatoes, olives, capers, garlic, and good olive oil, it transforms into something that tastes like the best kind of summer evening somewhere warm. The whole thing goes into one baking dish, into one oven, and comes out looking like you planned something ambitious. Mia now calls it the colorful fish, which means she will eat it willingly. Leo eats it with bread to soak up every last drop of the tomato and olive oil sauce, which is absolutely the right approach, and I have never stopped him.

    How To Make Baked Cod

    After the bare-dish disaster, I threw everything I could find in the Mediterranean direction at the next attempt. That batch was actually too much; I had used a full jar of capers, which made the whole thing taste like brine with a small piece of fish somewhere underneath. Leo fished the capers out one by one and set them on the side of his plate without comment. Mia counted them. There were thirty-seven. The third batch found the right balance: enough olives and capers to give it character, enough tomatoes to give it sweetness, enough lemon and herbs to give it brightness, and the cod sitting on top of it all so the bottom stays moist and the top gets just enough color.

    Main Ingredients

    • 4 cod fillets (about 6 oz / 170g each): pat completely dry before seasoning so the surface doesn’t steam in its own moisture
    • 1 cup cherry tomatoes, halved: mixed colours look stunning; they burst and release their juices as they roast, becoming the sauce
    • ½ cup mixed olives, pitted: Castelvetrano and Kalamata together give you buttery sweetness and brine in the same bite
    • 2 tbsp capers, rinsed: rinsed is non-negotiable; straight from the jar makes the whole dish too salty
    • 4 cloves garlic, thinly sliced: sliced rather than minced so it softens gently in the oven rather than burning
    • 3 tbsp extra virgin olive oil: good olive oil here matters; it carries all the flavours and becomes part of the sauce
    • 1 lemon, zest and juice: half the juice goes in before baking, half squeezed fresh over the top when it comes out
    • 1 tsp dried oregano: the herb that ties everything Mediterranean together
    • ½ tsp red pepper flakes (optional): Leo’s bowl gets them; Mia’s does not
    • Salt and black pepper to taste
    • Fresh parsley or basil to finish: added after baking; fresh herbs lose their brightness in the oven

    Step-by-Step Instructions

    Step 1: Build the Mediterranean Base

    • Preheat oven to 200°C (400°F) and lightly oil a baking dish large enough to hold all four fillets without crowding.
    • Add cherry tomatoes, olives, rinsed capers, garlic, oregano, and red pepper flakes to the dish and toss with 2 tablespoons of olive oil, half the lemon juice, lemon zest, and a generous pinch of salt.
    • Spread the vegetable mixture evenly across the bottom of the dish; this is the bed for the cod.
    • The base should look colorful and generously dressed; if it looks dry, add another small drizzle of olive oil.

    Step 2 — Season and Place the Cod

    • Pat cod fillets completely dry with paper towels and season both sides with salt and black pepper.
    • Lay the fillets on top of the tomato and olive mixture, pressing them down gently so the bottom of each fillet touches the vegetables.
    • Drizzle the remaining olive oil directly over the top of each fillet.
    • The cod should sit on top, not buried; it needs hot air to circulate and the edges to color slightly.

    Step 3: Bake to Perfection

    • Bake uncovered for 18 to 22 minutes depending on thickness cod is done when it flakes easily with a fork at the thickest part.
    • Do not overbake cod; it goes chalky and dry past the flake point; start checking at 18 minutes.
    • The tomatoes should be burst and jammy; the olives glossy, and there should be a pool of golden olive oil and tomato juice around the fish.
    • If the top of the fish looks pale, switch to the grill for the final 2 minutes for a light golden finish.

    Step 4: Finish and Serve

    • Squeeze the remaining half lemon over the entire dish the moment it comes out of the oven.
    • Scatter fresh parsley or torn basil generously over the top.
    • Serve directly from the baking dish; the sauce in the bottom is the point; spoon it over everything at the table.
    • Put good crusty bread on the table alongside; Leo will show everyone exactly what to do with the sauce.

    Baked Cod Variations

    Tuscan Baked Cod with White Beans

    Add a drained can of cannellini beans to the vegetable base before the cod goes on top. The beans absorb all the tomato and olive oil as they roast and become deeply savory and almost creamy. Mia discovered this version when she spotted a tin of beans in the pantry and said they looked lonely. She was right. They are outstanding in this dish, and now this recipe is her preferred version.

    Leo’s Spicy Mediterranean Version

    Double the red pepper flakes, add a teaspoon of smoked paprika to the vegetable base, and include a few sliced sun-dried tomatoes alongside the cherry tomatoes. Leo requested this after trying something similar at a friend’s house and describing it as “the one that makes your nose tingle.” The smoked paprika gives the whole dish a deeper, warmer character, and the sauce becomes almost smoky and sweet at the same time. Outstanding over rice.

    Mediterranean Baked Cod With Tomatoes and Feta

    Crumble 80g of good feta cheese over the vegetable base just before the cod goes on. The feta melts into the tomato juices and olive oil as it bakes, creating a sauce that is both creamy and sharp and genuinely one of the best things I have ever put on a piece of fish. Serve over orzo tossed in olive oil and lemon. This is the version I make when people are coming to dinner and I want to look like I have been cooking for longer than twenty minutes. I always have not been.

    Substitutions

    Cod → Snapper, halibut, or sea bass: Any firm white fish works with this Mediterranean topping. Snapper has more flavor and is slightly more forgiving. Halibut is denser and may need 2 to 3 extra minutes. Always use the flake test regardless of fish type.

    Fresh cherry tomatoes → Canned whole tomatoes, drained: Crush roughly by hand before adding. The flavor is slightly more concentrated, which works beautifully in winter when fresh cherry tomatoes are not at their best.

    Capers → Green olives, chopped: Finely chopped green olives give similar briny sharpness. Use the same quantity and rinse them first.

    Extra virgin olive oil → Avocado oil: Handles higher heat slightly better with a more neutral flavor, meaning the other ingredients carry more of the character. Still excellent.

    Equipment

    • Large baking dish (ceramic or glass; preferred metal discolours the sauce)
    • Paper towels for patting fish dry
    • Small bowl for rinsing capers
    • Microplane or fine grater for lemon zest
    • Fork for the flake test
    • Good crusty bread for serving (functionally essential)

    Storage Tips

    Make Ahead

    • Prep the vegetable base up to 4 hours ahead and refrigerate covered.
    • Add fresh cod just before baking; never marinate the fish overnight.

    Refrigerator

    • Leftovers in an airtight container up to 2 days.
    • The sauce gets better overnight as everything melds.

    Reheating

    • Reheat gently covered in a 150°C (300°F) oven for 8 minutes.
    • Avoid the microwave; it makes the fish rubbery very quickly.

    Freezing

    • Not recommended: cooked cod becomes watery and grainy when thawed.
    • The vegetable sauce freezes beautifully on its own; add fresh fish when ready.

    Family Secret Worth Sharing

    The secret that changed everything for me with this dish is that the cod cooks on top of the vegetables rather than in the middle of them. I used to tuck everything in together, fish buried under the tomatoes, completely surrounded, and it always came out steamed and pale rather than roasted and golden. Lifting the fillets so they rest on top of the vegetable mixture means the top of the fish gets direct oven heat and develops a little color, while the underside stays moist from the steam rising through the tomatoes. You get the best of both cooking methods in one dish without any extra effort. Mia noticed this the third time I made it and said the top looked like a proper restaurant fish, which, from a nine-year-old, is the highest compliment available. Leo was too busy eating to say anything at all, which I have decided counts equally.

    Troubleshooting FAQs

    Why is my baked cod dry and chalky?
    It was overbaked. Cod goes from perfect to dry in about three minutes. Start checking at 18 minutes regardless of what the recipe says, and pull it the moment it flakes cleanly at the thickest part. It will continue cooking slightly from residual heat even after it comes out of the oven.

    My dish is full of liquid, and the fish looks pale. What happened?
    The fish wasn’t dried before it went in, or the baking dish was too small, and everything steamed together instead of roasting. Pat the cod completely dry, make sure the dish is large enough, and check that the oven temperature is accurate under-temperature ovens steam rather than roast.

    Can I use frozen cod fillets?
    Yes, but they must be fully thawed and very thoroughly dried first. Frozen fish carries significantly more surface water than fresh and needs at least two rounds of patting with paper towels. Undried frozen cod is the main reason a dish ends up pale and watery rather than golden and jammy.

    Is this suitable for a Mediterranean diet?
    It is essentially a textbook Mediterranean diet meal: lean white fish, extra virgin olive oil, fresh vegetables, olives, and herbs with no processed ingredients. Low in saturated fat, high in lean protein, and rich in plant compounds from the tomatoes and olives.

    From Zero Personality to the Colourful Fish

    The thirty-seven caper incident is now family mythology. Leo counted them one more time a few weeks later just to be certain of his data, which tells you everything about him. Mia asks for the colorful fish at least once a week, and when she first used that name, I realized it was the best possible description of what this dish is. It is colorful. It is everything that the bare, sad code was not. The kitchen smells like somewhere you would want to eat, and the table looks like someone genuinely cared about the meal on it. The difference between good and bad in this case was just a handful of things from the pantry. That is a lesson worth keeping.

    For your weeknight dinner rotation, this baked cod belongs right alongside our easy one-pot chicken and rice as a one-dish wonder that takes almost no effort. If you love the olive oil and garlic combination, our honey garlic shrimp is the weeknight answer when you want something on the table in twenty minutes. And for more fish and dinner ideas from this kitchen, the whole dinner collection is worth a Sunday browse.

    Don’t forget to snap a picture of your baked cod before that gorgeous tomato and olive sauce disappears into the bread (trust me, it will disappear quickly!), and leave a rating below. We’d love to hear how this baked cod becomes part of your family’s weeknight dinner story.

  • Best Creamy Garlic Shrimp With Mashed Potatoes

    Best Creamy Garlic Shrimp With Mashed Potatoes

    The cream went over the edge of the pan while Leo was telling me something about a video game, and I was nodding without listening. My creamy garlic shrimp had become a creamy situation on the hob and a cleaning situation on the counter. Mia appeared in the doorway, looked at the stove, looked at me, and said: do we need the mop?” “We did.

    Why This Recipe Is Special

    This creamy garlic butter shrimp with mashed potatoes is precisely the kind of dinner that makes the whole kitchen smell like somewhere worth being. The garlic blooms in the butter before anything else touches the pan, the shrimp cook in about four minutes and come out golden and just slightly caramelized at the edges, and the cream goes in at the very end over reduced heat so it thickens without boiling over, which I now know is a rule. The mashed potatoes underneath are deeply buttery and completely smooth, and they soak up the sauce in a way that makes every spoonful taste like someone genuinely tried. Mia asks for this one when she has had a rough day. Leo requests it every single Friday. That combination is all the endorsement a recipe needs.

    How To Make Creamy Garlic Shrimp

    After the hob incident, which Mia has narrated to at least four different people, I learned three things. One: cream boils at a lower temperature than you expect, especially once garlic butter is already in the pan generating heat. Two: Leo’s video game updates are not an emergency and can wait until the cream is in. Three: the cream should go in as the very last hot step, then the heat drops immediately, and you stir slowly until it coats everything. Mia tested the sauce on batch two with a teaspoon and pronounced it “much better than the floor version.” The floor version had been my lowest moment as a cook. Batch two was not.

    Main Ingredients

    • 1½ lbs large shrimp, peeled and deveined: pat completely dry before seasoning; moisture prevents the golden sear
    • 5 cloves garlic, finely minced: garlic-forward sauce; don’t reduce it; softens and sweetens as it blooms
    • 4 tbsp unsalted butter, divided: 2 tbsp for searing shrimp, 2 tbsp for building the sauce
    • 1 cup heavy cream: goes in last, over reduced heat, stirred, not left alone; this is the lesson
    • ½ cup chicken or seafood broth: thins the sauce so it coats rather than clumps; seafood broth deepens the flavor.
    • ½ cup freshly grated parmesan: stirred in off the heat; pre-grated goes grainy in cream sauce
    • 1 tsp smoked paprika: for the shrimp; adds warmth without overpowering the cream
    • ½ tsp red pepper flakes (optional): Mia’s bowl gets none; Leo’s gets extra
    • Salt and black pepper to taste
    • Fresh parsley and a squeeze of lemon to finish

    For the Mashed Potatoes

    • 2 lbs Yukon Gold potatoes, peeled and quartered: naturally buttery and less starchy; mash smoother with less effort
    • 4 tbsp unsalted butter: added while potatoes are still steaming hot
    • ½ cup warm whole milk or cream: warm is critical; cold dairy makes mash gluey and dense
    • Salt to taste

    Step-by-Step Instructions

    Step 1: Boil and Mash the Potatoes

    • Place peeled, quartered potatoes in a large pot of cold salted water; bring to a boil and cook for 15 to 18 minutes until completely tender when pierced with a fork.
    • Drain well and return to the hot pot for 1 minute over low heat to steam off any excess moisture; this prevents watery mash.
    • Add butter and mash until mostly smooth, then pour in warm milk gradually, mashing and stirring until completely creamy.
    • Season generously with salt, taste, and keep warm with the lid on while you cook the shrimp.

    Step 2: Season and Sear the Shrimp

    • Pat shrimp completely dry and season with smoked paprika, salt, pepper, and red pepper flakes if using.
    • Heat 2 tablespoons of butter in a large skillet over medium-high until foaming subsides.
    • Add shrimp in a single layer and cook 1 to 1½ minutes per side until pink with golden edges do not crowd, or they will steam.
    • Transfer to a plate; the shrimp will finish warming through in the sauce.

    Step 3: Build the Creamy Garlic Sauce

    • Reduce heat to medium and add the remaining 2 tablespoons of butter to the same pan.
    • Add minced garlic and stir for 45 seconds until fragrant and golden don’t walk away; the timing is where attention matters.
    • Pour in the broth and let it bubble for 1 minute, scraping up any golden bits from the shrimp.
    • Reduce heat to medium-low, pour in the cream, and stir gently and constantly for 2 to 3 minutes until thickened — never let it boil.

    Step 4: Finish, Plate and Serve

    • Remove the pan from heat and stir in freshly grated parmesan until completely melted into the sauce.
    • Return shrimp to the pan and fold gently through the sauce to warm through for about 1 minute.
    • Spoon generous mashed potato into each bowl and ladle creamy garlic shrimp and sauce over the top.
    • Finish with fresh parsley, a squeeze of lemon, and a crack of black pepper; serve immediately.

    Creamy Garlic Shrimp Variations

    Creamy Seafood Dinner with Scallops and Shrimp

    Replace half the shrimp with large scallops pat them completely dry and sear 2 minutes per side without moving until a deep golden crust forms. Set aside the shrimp and finish them in the sauce at the end. This recipe is the version I make when we have people over and I want the table to go quiet for about thirty seconds when the bowls arrive. Leo has started requesting it as the “fancy version” of Friday dinner, which I take as an enormous compliment.

    Mia’s Mild Creamy Garlic Butter Shrimp

    Skip the paprika and red pepper flakes, reduce the garlic to 3 cloves, and add a teaspoon of lemon zest to the sauce instead. Mia designed this version herself across about four Friday nights, removing things one at a time until she declared it correct. The lemon zest brightens the whole sauce without any heat and makes it taste lighter and more spring-like. She eats it with a spoon, which means she is getting the sauce ratio exactly right.

    Creamy Garlic Shrimp Over Rice Instead

    Swap the mashed potatoes for steamed jasmine rice or orzo cooked in broth. The sauce works over anything that absorbs it rice, pasta, polenta, or crusty bread. Leo prefers the rice version on school nights when he wants something lighter underneath. This is also the version I pack into containers for next-day lunch, and it reheats beautifully with a splash of broth stirred through.

    Substitutions

    Heavy cream → Half-and-half or evaporated milk: Both work; the sauce will be slightly thinner. Compensate by reducing the broth to ¼ cup. Evaporated milk gives a slightly sweeter note that works well with the garlic.

    Parmesan → Pecorino romano or Gruyère: Pecorino makes the sauce sharper and saltier; reduce added salt. Gruyère melts into an extraordinarily smooth and nutty sauce. Both must be freshly grated.

    Yukon Gold potatoes → Cauliflower mash: Steam a whole head of cauliflower florets until very tender, then blend with butter, warm cream, and salt until completely smooth. It is outstanding with the creamy garlic shrimp sauce and considerably lower in carbs.

    Fresh shrimp → Frozen shrimp, fully thawed: Thaw in cold water for 15 minutes, drain, and pat completely dry. Do not skip the drying; thawed shrimp carry more surface moisture and will steam rather than sear if wet.

    Equipment

    • Large pot for the potatoes
    • Large skillet or sauté pan (12-inch minimum)
    • Potato masher or ricer
    • Tongs or silicone spatula for the shrimp
    • Microplane or fine grater for parmesan
    • Ladle for serving the sauce
    • Warm shallow bowls for serving

    Storage Tips

    Make Ahead

    • Mash potatoes up to 2 hours ahead; keep warm with lid on over lowest heat.
    • Season shrimp up to 4 hours ahead; refrigerate uncovered on a plate.

    Refrigerator

    • Store shrimp and mash separately and airtight for up to 2 days.
    • Best within 24 hours shrimp texture changes quickly in cream sauce.

    Reheating

    • Reheat shrimp in sauce gently in a skillet over medium-low with a splash of broth.
    • Never microwave shrimp; they overcook in seconds.
    • Reheat mash in a pot with a splash of warm milk, stirring.

    Freezing

    • Not recommended for the finished dish; cream sauce separates when frozen.
    • Freeze cooked shrimp separately without sauce; make fresh sauce when ready to serve.

    Family Secret Worth Sharing

    The thing about a cream sauce is that it needs to be treated like a guest you are slightly nervous about: attentively, patiently, and with the heat lower than you think is necessary. I learned this after the hob incident. Every time I make this now, I say the same thing out loud to whoever is in the kitchen with me: cream does not boil, cream simmers, and there is a difference. Mia can recite the recipe now by heart, which means she has heard it approximately twelve times. Leo cannot, which means he has not been listening, which is how the hob incident happened in the first place. The trick is to add the cream to a pan that has already been pulled back from the boil, not into a pan that is actively bubbling, which is what I did the first time while nodding along to a game update I still do not understand. Medium-low heat, slow stirring, and patience. That is the whole story.

    Troubleshooting FAQs

    Why did my cream sauce break or turn grainy?
    The heat was too high, or the parmesan went in while the pan was still on the heat. Always remove the pan from the heat before stirring in the parmesan, and never let the cream boil. If it does break, add a splash of warm broth and stir vigorously off the heat to bring it back.

    My shrimp are rubbery what happened?
    They were overcooked during the sear, or they sat in the warm sauce too long before serving. Shrimp only need 1 to 1½ minutes per side. Pull them the moment they curl into a loose C shape and turn pink, then keep the return to the sauce brief just long enough to warm through.

    My mashed potatoes are gluey and sticky why?
    Two causes: over-mashing (use a masher, not a food processor) or cold dairy. Always heat your milk or cream before adding it to the potato. Steam off excess moisture after draining by returning the pot to low heat for a minute before you start mashing.

    Can I make the sauce ahead?
    Make the garlic butter broth base up to a few hours ahead, then add cream and fresh parmesan when ready to serve. The texture is always best the first time it comes together. Make the mash and shrimp fresh; the sauce base is the only thing worth prepping ahead.

    The Mop Was Worth It

    We did need the mop. Mia found it. Leo felt guilty enough to set the table without being asked, which is so rare it counts as a win regardless of what caused it. The second batch of creamy garlic butter shrimp with mashed potatoes was ready forty minutes after the first one ended up on the hot plate. It was so excellent that nobody mentioned the floor. We ate the whole thing. On Fridays it is the most requested dinner in this house, and I make it without drama now, stirring slowly with the heat down low and both kids hovering near the kitchen door, asking how long until it’s ready.

    If you are looking to add more easy weeknight dinners that feel genuinely special without the effort, this creamy garlic shrimp earns its permanent spot. It belongs right alongside our honey garlic shrimp as a Friday dinner that runs itself once you know the rules. And for more comfort food dinners worth trying, the whole dinner collection is there for when you need ideas on a Sunday evening.

    Please remember to snap a picture of your creamy garlic shrimp before that glossy sauce disappears into the mashed potatoes (trust me, it will disappear quickly!), and leave a rating below. We’d love to hear how this creamy garlic shrimp becomes part of your family’s Friday dinner story.

  • Best Garlic Parmesan Chicken Meatloaf

    Best Garlic Parmesan Chicken Meatloaf

    It came out of the pan in four separate pieces. Not slices or pieces, the way something breaks when it has completely lost the will to hold together. Mia said it looked like a garlic parmesan chicken meatloaf earthquake. Leo agreed and named the pieces. I stood at the counter with an oven mitt and a spatula and no good explanation. Breadcrumbs. The answer was breadcrumbs.

    Why This Recipe Is Special

    Chicken meatloaf gets a bad reputation, and I understand why most versions are dry, crumbly, and taste like something that tried hard and didn’t quite make it. This one is different. The parmesan melts through the loaf as it bakes, keeping it moist and adding a nutty saltiness that works with the garlic in a way that makes every slice taste like something you’d order at a proper restaurant. It slices cleanly, it holds together beautifully, and it reheats the next day in a way that makes Leo request it cold in his lunchbox, which is the kind of review that makes all the earlier disasters genuinely worthwhile. Mia puts it in a wrap with roasted peppers. That is also excellent.

    How To Make Garlic Parmesan Chicken Meatloaf

    After the earthquake incident, I did three things differently. First, enough breadcrumbs, not a token pinch, but a full measured amount, which I had eyeballed the first time and dramatically underestimated. Second: I learned that chicken mince is much wetter than beef, and if you don’t squeeze excess moisture from any added vegetables, the whole loaf can’t set. Third: Leo informed me, at some length, that meatloaf needs a glaze, not just a naked top, because “things need a reason to look good.” He was nine and completely right. The version you have here has all three lessons cooked into it.

    Main Ingredients

    • 1.5 lbs (680g) ground chicken: use a blend of dark and white if you can; all breast meat goes dry very easily
    • ¾ cup freshly grated parmesan: freshly grated melts into the loaf; pre-grated powder stays grainy
    • 5 cloves garlic, finely minced: the backbone of the whole recipe; don’t reduce it
    • ½ cup breadcrumbs (Italian or plain): the binder that holds everything together; you cannot skip or reduce this
    • 1 large egg: the second binder; room temperature incorporates more evenly
    • ¼ cup whole milk: moistens the breadcrumbs so they stay soft inside and don’t create dry pockets
    • 2 tbsp fresh parsley, finely chopped: adds colour and a fresh note; Mia picks the visible bits out and Leo eats them deliberately
    • 1 tsp dried Italian seasoning
    • 1 tsp onion powder: adds depth without visible onion pieces
    • ½ tsp salt and ½ tsp black pepper

    For the Garlic Parmesan Glaze

    • 3 tbsp unsalted butter, melted: the glaze base that browns and crisps the top into that golden crust
    • 2 cloves garlic, minced: double garlic hit is what makes this recipe memorable
    • 2 tbsp freshly grated parmesan: scattered over glaze; melts into a golden crust in the last 10 minutes
    • 1 tbsp fresh parsley for topping

    Step-by-Step Instructions

    Step 1: Soak the Breadcrumbs and Prep

    • Preheat oven to 190°C (375°F) and line a loaf pan or rimmed baking tray with parchment paper.
    • Combine breadcrumbs and milk in a small bowl and let them soak for 5 minutes until the milk is fully absorbed; this panade is what keeps the loaf moist.
    • Mince the garlic very finely for both the loaf and the glaze; keep them in separate small bowls.
    • Mix melted butter and minced glazed garlic together in a small bowl and set aside.

    Step 2: Mix the Meatloaf Gently

    • In a large bowl, combine ground chicken, soaked breadcrumbs, parmesan, garlic, egg, parsley, Italian seasoning, onion powder, salt, and pepper.
    • Mix gently with your hands until just combined; do not overwork, or the chicken and loaf will be dense and tight.
    • The mixture should feel slightly sticky; if it seems too wet, add 1 extra tablespoon of breadcrumbs and mix once more.
    • Taste a tiny pinch for seasoning; it should taste well-seasoned and slightly salty before baking.

    Step 3: Shape, Glaze and Bake

    • Transfer the mixture to the prepared pan and shape into a firm loaf about 9 inches long press together firmly so there are no air pockets inside.
    • Brush the garlic butter glaze generously over the entire surface of the loaf.
    • Bake for 45 minutes, then scatter the extra parmesan over the top and return to the oven for a final 10 minutes until deep golden and a thermometer reads 165°F (74°C) at the center.
    • Rest for 10 full minutes before slicing; this step is not optional; cutting too early loses all the juices, and the loaf falls apart.

    Step 4: Slice, Garnish and Serve

    • Use a sharp serrated knife and slice with a gentle sawing motion; do not press down or the loaf compresses.
    • Scatter fresh chopped parsley over the top and add a drizzle of any pan juices from the parchment.
    • Serve with mashed potato, roasted vegetables, or a simple green salad alongside.
    • Leftover slices are exceptional cold in a sandwich the next day. Leo will confirm this unprompted.

    Garlic Parmesan Chicken Meatloaf Variations

    Sun-Dried Tomato and Basil Stuffed Version

    Press half the meatloaf mixture into the loaf pan, lay a line of drained sun-dried tomatoes and torn fresh basil down the center, then press the remaining mixture firmly on top and seal the edges. Bake as directed. When you slice it, the filling runs through every piece like a seam. Mia discovered this when she put things in “to make it look more interesting” before I pressed the top layer down, and it became one of the best accidents this kitchen has ever produced.

    Leo’s Spicy Calabrian Version

    Add 1 tablespoon of Calabrian chilli paste or finely chopped jarred Add Calabrian chilies to the meat mixture before combining. Leo requested this after eating something similar at a friend’s house and declaring it “the best thing I’ve eaten that wasn’t here.” The heat is gentle and earthy rather than sharp, and it pairs with the parmesan in a way that makes the whole loaf taste considerably more complex. Serve with cooling yogurt or sour cream on the side.

    Turkey Meatloaf with the Same Glaze

    Swap the ground chicken for ground turkey in the exact same quantities. Turkey is slightly leaner and drier, so add an extra tablespoon of milk to the panade. The garlic parmesan glaze works identically, and the bake time is the same. This is the version I make in November when turkey is on everyone’s mind and the kids pretend they are eating something festive even on a Wednesday in the middle of the school week.

    Substitutions

    Ground chicken → Ground turkey: Direct swap with the same measurements. Add 1 extra tablespoon of milk to the panade since turkey is slightly leaner. Bake time and temperature are identical.

    Breadcrumbs → Almond flour (for gluten-free): Same quantity. Almond flour absorbs slightly less moisture, so the mixture may feel wetter add an extra egg yolk if too loose. The baked loaf is slightly more tender and crumbly, still excellent.

    Freshly grated parmesan → Pecorino romano: Sharper and saltier; reduce added salt in the mixture to a quarter teaspoon if making this swap. The crust on top is even more golden and flavorful with pecorino.

    Whole milk → Unsweetened oat milk or almond milk: Works as a direct swap in the panade with no noticeable difference to the finished texture. Makes the recipe dairy-free if you also use a dairy-free parmesan alternative.

    Equipment

    • 9×5 inch loaf pan or rimmed baking tray
    • Parchment paper
    • Large mixing bowl
    • Two small bowls (one for panade, one for glaze)
    • Pastry brush for glazing
    • Instant-read meat thermometer (non-negotiable)
    • Sharp serrated knife for slicing

    Storage Tips

    Make Ahead

    • Mix and shape the loaf up to 24 hours ahead; cover tightly and refrigerate unbaked.
    • Add the glaze just before baking, not ahead of time.

    Refrigerator

    • Sliced or whole, up to 4 days in an airtight container.
    • Cold slices are outstanding in sandwiches the next day.

    Freezing

    • Freeze individual slices wrapped tightly in plastic then foil for up to 3 months.
    • Thaw overnight in the fridge; reheat gently in a covered pan with a splash of broth.

    Reheating

    • Covered skillet over medium-low with a splash of chicken broth for 3 to 4 minutes per side.
    • Avoid the microwave; it dries ground chicken out very quickly.

    Family Secret Worth Sharing

    The panade—the soaked breadcrumb and milk mixture—is the single thing I wish I had known about from the very first attempt. A panade does two things: it keeps the loaf moist by trapping steam as the breadcrumbs swell during baking, and it prevents the loaf from becoming tough by coating the protein strands so they can’t seize up and contract. Without it, chicken meatloaf bakes dry and dense every single time, no matter how carefully you handle the meat. With it, every slice is genuinely tender all the way through. I found this technique in an old cooking notebook that belonged to my grandmother, written in her handwriting in the margin of a beef meatloaf recipe she’d adapted over the years. She didn’t explain it she just wrote “soak the crumbs first, always.” Mia found the notebook once and asked why it said that. I told her it was kitchen wisdom passed down. She wrote it on the inside of her craft folder at school. I haven’t told her what a panade is yet. That conversation is coming.

    Troubleshooting FAQs

    Why did my chicken meatloaf fall apart when I sliced it?
    Either the breadcrumbs were underestimated, the loaf was cut before resting, or both. You need the full measured half cup of breadcrumbs; chicken mince is much wetter than beef and needs more binder. Then rest for a full 10 minutes after it comes out of the oven. This was the earthquake lesson.

    My meatloaf is cooked on the outside but raw in the centre what happened?
    The oven temperature was too high, and the outside cooked faster than the heat could reach the center. Always use a meat thermometer and trust it over visual cues the surface can brown well before the center reaches a safe 165°F. If the top is browning too fast, tent loosely with foil after 35 minutes.

    Can I make this without a loaf pan?
    Yes, and it actually gives a better crust on all sides. Shape the mixture into a free-form loaf on a parchment-lined rimmed baking tray. The exposed sides crisp up beautifully under the glaze. Check at 45 minutes; free-form loaves often cook a few minutes faster than loaf-pan versions.

    Can I add vegetables to the mixture?
    Yes, but moisture management is critical. Any added vegetables must be squeezed or cooked dry first. Grate, salt, wait 5 minutes, then squeeze in a clean kitchen towel before adding. Raw vegetables release water during baking and can prevent the loaf from setting properly.

    From Earthquake to Standing Ovation

    The pieces Leo named that first night were the Corner, the Slide, the Bit By the Pan, and something he called the Orphan. He was nine and very serious about it. Now he asks for the dish by name the way he asks for exactly three things in rotation is the lemon bowl, the honey garlic shrimp, and the garlic parmesan chicken meatloaf. Mia no longer documents my kitchen failures photographically. That is progress. The cooling rack gets crowded quickly every time the meatloaf comes out of the oven, and I have learned to slice it fast.

    If you are building your family dinner rotation with recipes that genuinely hold up week after week, this garlic parmesan chicken meatloaf belongs alongside our easy one-pot chicken and rice as a bake-and-rest dinner that practically runs itself. For more chicken dinner ideas, the whole dinner collection is worth a browse. And if you want a quicker garlic butter chicken fix on a weeknight, our honey garlic shrimp is the 20-minute answer.

    Please remember to snap a picture of your garlic parmesan chicken meatloaf before those golden slices disappear off the board (trust me, they will disappear quickly!), and leave a rating below. We’d love to hear how this garlic parmesan chicken meatloaf becomes part of your family’s dinner story.

  • 5 Secrets to the Best Protein Chicken Salad

    5 Secrets to the Best Protein Chicken Salad

    Mia looked at the bowl, then looked at me, and said very seriously, “Mom, is the meal a punishment?” I had used canned tuna instead of chicken by accident, forgotten to drain it, and added so much celery it crunched on every single bite. My protein chicken salad was not chicken. Leo confirmed the result. I stood there reading the tin label. Right. We started from scratch.

    Why This Recipe Is Special

    This protein chicken salad sits in a very particular and useful category: it genuinely fills you up, it takes fifteen minutes to make, and it doesn’t feel like punishment food, which, as Mia’s early review made clear, is a standard that matters enormously in this household. Two cups of shredded chicken breast gives you over 40 grams of protein per serving before anything else goes in. Added Greek yogurt instead of pure mayo keeps it creamy while stacking the protein even higher. For anyone following a keto diet, bariatric eating guidelines, or just trying to eat more protein at lunch without cooking an entire meal, this is the bowl that does it. Leo wraps it up. Mia eats it with crackers. I eat it straight from the bowl with a fork, which is the correct way.

    How To Make Protein Chicken Salad

    After the tuna incident, which nobody has forgotten despite my best efforts, I rebuilt this recipe very deliberately. The second lesson came from overdressing. I added too much mayo-yogurt mix on a day when I was in a hurry, and the whole thing became a puddle. Leo said it looked like soup that couldn’t decide what it wanted to be. Mia took photos. The fix is to add the dressing in two stages: add half first, mix, check the consistency, and then add more only if it needs it. That one change made this recipe something I actually look forward to making on a Sunday for the week ahead.

    Main Ingredients

    • 2 cups cooked chicken breast, shredded or diced: poached or rotisserie both work; rotisserie saves time and the flavour holds up beautifully in a salad
    • 3 tbsp plain Greek yogurt (full-fat): the protein booster that replaces some of the mayo; full-fat keeps the texture creamy rather than watery
    • 2 tbsp good quality mayonnaise: still here for flavour and richness; Greek yogurt alone makes it taste too sharp
    • 1 tbsp Dijon mustard: the flavour anchor; don’t skip this; it’s what makes it taste like more than just chicken in a sauce
    • 1 stalk celery, finely diced: finely diced this time, not huge chunks; this was a lesson I learned
    • 2 tbsp red onion, finely minced (optional): adds a sharp note; soak in cold water for 5 minutes first if you want it milder
    • 1 tbsp fresh lemon juice: brightens the whole bowl; bottled lemon tastes flat here
    • Salt and black pepper to taste
    • Fresh dill or parsley, roughly chopped (optional): Mia picks the dill out and Leo eats all of his without complaint
    • 2 tbsp dried cranberries or halved grapes (optional): adds a sweet contrast that makes this feel less like diet food and more like something you actually chose to eat

    Step-by-Step Instructions

    Step 1: Prep the Chicken and Mix-ins

    • If cooking from scratch, poach chicken breast in lightly salted water for 15 minutes until cooked through, then let it cool completely before shredding.
    • Shred or dice cooled chicken into bite-sized pieces shredded gives a traditional texture; diced is easier for wraps and meal prep containers.
    • Finely dice the celery and red onion; if using red onion, soak in cold water for 5 minutes and then drain well to soften the bite.
    • Set all prepped ingredients aside before making the dressing; adding dressing to warm chicken makes it watery.

    Step 2: Make the Protein Dressing

    • Whisk together Greek yogurt, mayonnaise, Dijon mustard, and lemon juice in a small bowl until completely smooth.
    • Season generously with salt and black pepper; the dressing needs to be well-seasoned on its own before it touches the chicken.
    • Taste and adjust: more lemon if it needs brightness, more mustard if it tastes flat, more yogurt if it needs creaminess.
    • The dressing should be thick and spoonable, not runny; if it pours easily, it will make the salad watery.

    Step 3: Combine and Taste

    • Add the chicken, celery, and onion to a large bowl and add half the dressing first; stir gently to coat.
    • Check the consistency; it should look creamy and cohesive, not dry and not soupy; add more dressing only if needed.
    • Fold in cranberries or grapes if using and the fresh herbs, and stir once more.
    • Taste the finished salad and adjust salt, pepper, and lemon before serving; this is the most important step.

    Step 4: Serve or Store

    • Serve immediately on lettuce cups, in a wrap, on crackers, or straight from the bowl with a fork.
    • For meal prep, divide into four airtight containers and refrigerate; the flavor is actually better after a few hours.
    • If serving later, hold back a tablespoon of dressing and stir it in fresh before eating to restore the creamy texture.
    • Top with extra dill, a crack of black pepper, and a squeeze of lemon right before serving.

    Protein Chicken Salad Variations

    Keto Chicken Salad with Bacon and Avocado

    Skip the cranberries entirely and add 2 strips of crumbled crispy bacon and half a diced ripe avocado. This version sits beautifully inside a keto diet framework: zero added sugar, high fat, and very high protein, and it is the version Leo approves of most enthusiastically, largely because of the bacon. He adds it to everything now. The avocado makes it extraordinarily creamy without any extra mayo. Eat it immediately once the avocado is in; it doesn’t hold overnight.

    Mia’s Mild Version with Apple and Honey

    Replace the Dijon with a teaspoon of honey and swap the red onion for a quarter cup of finely diced sweet apple. Mia built this variation over three separate lunch prep sessions, removing things she didn’t like one by one with the careful method of a scientist. The result is genuinely excellent, sweeter and milder, still packed with protein, and the apple adds a little crunch that everyone at the table ends up requesting. It also works exceptionally well in a sandwich.

    High Protein Caveman-Style Bowl

    Double the chicken to 3 cups, skip all the optional extras, and serve the salad over sliced cucumber rounds or thick-cut romaine instead of any bread or crackers. This stripped-back version aligns with paleo and caveman diet principles: just clean protein, a small amount of healthy fat from the mayo and yogurt, and fresh vegetables. Leo calls it the boring one. I call it “Tuesday lunch” when I have a 2pm meeting and no time to think about food.

    Substitutions

    Greek yogurt → Cottage cheese, blended smooth: Blend cottage cheese until completely smooth before using. It adds even more protein than Greek yogurt, and the texture is nearly identical in the finished salad. This is a favorite swap for anyone following bariatric eating guidelines where high protein per calorie matters most.

    Chicken breast → Canned chicken, well drained: Works well in a pinch and is genuinely faster. Drain very thoroughly; this was where the tuna incident began, and pat dry with paper towels. The texture is slightly softer, but the flavor holds up well with a good dressing.

    Mayonnaise → Avocado oil mayo or plain avocado: Avocado oil mayo swaps 1:1 for a cleaner fat profile. Or mash half a ripe avocado directly into the dressing for a dairy-free, mayo-free version that is remarkably good and very high in healthy fat.

    Fresh lemon juice → Apple cider vinegar: Use half the quantity, 1½ teaspoons, instead of 1 tablespoon. Apple cider vinegar gives a slightly sharper, earthier tang that works particularly well in the caveman-style version with no fruit.

    Equipment

    • Large mixing bowl
    • Small bowl for dressing
    • Whisk or fork for dressing
    • Sharp knife and cutting board
    • Two forks for shredding chicken
    • 4 airtight containers for meal prep

    Storage Tips

    Make Ahead

    • Make the full salad up to 1 day ahead; it actually tastes better after a few hours.
    • Hold back 1 tablespoon of dressing to stir in fresh before serving to restore creaminess.

    Refrigerator

    • Airtight container up to 3 days.
    • Stir well before serving; the dressing can settle at the bottom.
    • Do not keep it for more than 3 days once dressed.

    Meal Prep

    • Divide into 4 individual containers for the week.
    • Keep crackers, wraps, or lettuce cups separate until serving.
    • Ideal Sunday prep ready for Monday through Wednesday lunches.

    Freezing

    • Not recommended mayo and yogurt separate when thawed and become grainy.
    • Freeze cooked plain chicken only; dress fresh when ready to serve.

    Family Secret Worth Sharing

    The two-stage dressing trick changed this recipe entirely. I used to add everything at once and wonder why it was always either too dry or too wet, never quite right. What I didn’t understand was that the chicken releases a little moisture as it sits in the dressing, so what looks slightly underdressed when you first mix it is usually perfectly dressed five minutes later. Adding half the dressing first, waiting a minute, then deciding whether it needs more is the move that makes this consistently good rather than occasionally good. My mom dressed salads by eye and never measured anything, and I used to think that was a gift she had that I didn’t. It turns out it was just practice and patience, which are both things I now have and which Mia watches very carefully every Sunday while I make the salad, spoon in hand, waiting to be appointed tasting officer. She always is.

    Troubleshooting FAQs

    Why is my chicken salad watery after a few hours?
    The chicken was warm when you dressed it, or the celery wasn’t properly dried after washing. Always use completely cooled chicken and pat everything dry before mixing. The two-stage dressing method also helps add less dressing than you think you need, because the chicken releases moisture as it sits.

    Can I make this for bariatric meals?
    This dish is actually one of the best recipes for bariatric eating: high protein, moderate fat, low carb, and genuinely flavorful in small portions. The Greek yogurt swap boosts protein per calorie compared to full-fat mayo. Swap all the mayonnaise for blended cottage cheese to push the protein even higher and reduce the fat further.

    How do I get more flavor without more calories?
    Season in layers. Season the chicken while it cooks, season the dressing separately before it meets the chicken, and taste and adjust the finished salad before serving. Each stage of seasoning builds depth. The Dijon and lemon are doing a lot of work here; don’t reduce either of them.

    Is this recipe keto and low carb?
    Yes, served on lettuce cups or cucumber rounds, it is fully keto-friendly, with around 4 to 6 grams of net carbs per serving. Skip the cranberries and grapes for a stricter version. The keto bacon and avocado variation brings the carbs even lower while adding healthy fats.

    The Bowl That Proved Mia Wrong

    Mia still has opinions about this recipe. She will tell you that her version with the apple and honey is definitively better, and she is not entirely wrong, but she also eats the original version on Tuesdays without being asked and refills her bowl when she thinks I am not watching. Leo hasn’t asked, “Is this chicken?” since the second batch. I take that as the highest possible endorsement. Sunday protein chicken salad prep has become the thing we do together now: Mia on dressing duty, Leo in charge of shredding, and me trying not to get distracted and add too much of anything.

    If you are building a collection of easy weeknight dinners that actually work for the whole family, this chicken salad earns its permanent spot in the rotation. It sits right alongside our high protein honey garlic shrimp as proof that healthy and delicious are not opposing goals. And for more recipes in the same spirit, the whole healthy recipes collection is worth an hour of browsing on a Sunday when you are planning the week.

    Don’t forget to snap a picture of your protein chicken salad before those creamy, herby spoonfuls disappear into wraps and lunchboxes (trust me, they will disappear quickly!), and leave a rating below. We’d love to hear how this protein-rich chicken salad becomes part of your family’s weekly lunch story.